Configuring and managing virtualization
Setting up your host, creating and administering virtual machines, and understanding virtualization features in Red Hat Enterprise Linux 8
Abstract
Providing feedback on Red Hat documentation
We appreciate your input on our documentation. Please let us know how we could make it better. To do so:
- For simple comments on specific passages, make sure you are viewing the documentation in the Multi-page HTML format. Highlight the part of text that you want to comment on. Then, click the Add Feedback pop-up that appears below the highlighted text, and follow the displayed instructions.
For submitting more complex feedback, create a Bugzilla ticket:
- Go to the Bugzilla website.
- As the Component, use Documentation.
- Fill in the Description field with your suggestion for improvement. Include a link to the relevant part(s) of documentation.
- Click Submit Bug.
Chapter 1. Virtualization in RHEL 8 - an overview
If you are unfamiliar with the concept of virtualization or its implementation in Linux, the following sections provide a general overview of virtualization in RHEL 8: its basics, advantages, components, and other possible virtualization solutions provided by Red Hat.
1.1. What is virtualization in RHEL 8?
Red Hat Enterprise Linux 8 (RHEL 8) provides the virtualization functionality. This means that with the help of virtualization software, a machine running RHEL 8 can host multiple virtual machines (VMs), also referred to as guests. Guests use the host’s physical hardware and computing resources to run a separate, virtualized operating system (guest OS) as a user-space process on the host’s operating system.
In other words, virtualization makes it possible to have operating systems within operating systems.
VMs enable you to safely test software configurations and features, run legacy software, or optimize the workload efficiency of your hardware. For more information on the benefits, see Section 1.2, “Advantages of virtualization”.
For more information on what virtualization is, see the Red Hat Customer Portal.
To try out virtualization in RHEL 8, see Chapter 2, Getting started with virtualization in RHEL 8.
In addition to RHEL 8 virtualization, Red Hat offers a number of specialized virtualization solutions, each with a different user focus and features. For more information, see Section 1.5, “Red Hat virtualization solutions”.
1.2. Advantages of virtualization
Using virtual machines (VMs) has the following benefits in comparison to using physical machines:
Flexible and fine-grained allocation of resources
A VM runs on a host machine, which is usually physical, and physical hardware can also be assigned for the guest OS to use. However, the allocation of physical resources to the VM is done in software, and is therefore very flexible. A VM uses a configurable fraction of the host memory, CPUs, or storage space, and that configuration can specify very fine-grained resource requests.
For example, what the guest OS sees as its disk can be represented as a file on the host file system, and the size of that disk is much less constrained than the available sizes for physical disks.
Software-controlled configurations
All of a VM’s configuration is saved as data on the host, and under software control. Therefore, a VM can easily be created, removed, cloned, migrated, operated remotely, or connected to remote storage.
In addition, the current state of the VM can be backed up as a snapshot at any time. A snapshot can then be loaded to restore the system to the saved state.
Separation from the host
A guest runs on a virtualized kernel, separate from the host OS. This means that any OS can be installed on a VM, and that even if the guest OS becomes unstable or is compromised, the host is not affected in any way.
NoteNot all operating systems are supported as a guest OS in a RHEL 8 host. For details, see Section 11.2, “Recommended features in RHEL 8 virtualization”.
Space and cost efficiency
A single physical machine can host a large number of VMs. Therefore, it avoids the need for multiple physical machines to do the same tasks, and thus lowers the space, power, and maintenance requirements associated with physical hardware.
1.3. RHEL 8 virtual machine components and their interaction
Virtualization in RHEL 8 consists of the following principal software components:
Hypervisor
The basis of creating virtual machines (VMs) in RHEL 8 is the hypervisor, a software layer that controls hardware and enables running multiple operating systems on a host machine.
The hypervisor includes the Kernel-based Virtual Machine (KVM) kernel module and virtualization kernel drivers, such as virtio and vfio. These components ensure that the Linux kernel on the host machine provides resources for virtualization to user-space software.
At the user-space level, the QEMU emulator simulates a complete virtualized hardware platform that the guest operating system can run in, and manages how resources are allocated on the host and presented to the guest.
In addition, the libvirt software suite serves as a management and communication layer, making QEMU easier to interact with, enforcing security rules, and providing a number of additional tools for configuring and running guests.
XML configuration
A host-based XML configuration file (also known as a domain XML file) describes a specific VM. It includes:
- Metadata such as the name of the VM, time zone, and other information about the VM.
- A description of the devices in the VM, including virtual CPUs (vCPUS), storage devices, input/output devices, network interface cards, and other hardware, real and virtual.
- VM settings such as the maximum amount of memory it can use, restart settings, and other settings about the behavior of the VM.
Component interaction
When a VM is started, the hypervisor creates an instance of the VM as a user-space process on the host based on the XML configuration. The hypervisor also makes the VM process accessible to the host-based interfaces, such as the virsh, virt-install, and guestfish commands, or the web console GUI.
When these virtualization tools are used, libvirt translates their input into instructions for QEMU. QEMU communicates the instructions to KVM, which ensures that the kernel appropriately assigns the resources necessary to carry out the instructions. As a result, QEMU can execute the corresponding user-space changes, such as creating or modifying a guest, or performing an action in the guest’s operating system.
While QEMU is an essential component of the architecture, it is not intended to be used directly on RHEL 8 systems, due to security concerns. Therefore, using qemu-* commands is not supported by Red Hat, and it is highly recommended to interact with QEMU using libvirt.
For more information on the host-based interfaces, see Tools and interfaces for virtualization management in RHEL 8.
Figure 1.1. RHEL 8 virtualization architecture

1.4. Tools and interfaces for virtualization management in RHEL 8
You can manage virtualization in RHEL 8 using the command-line interface (CLI) or several graphical user interface (GUIs).
Command-line interface
The CLI is the most powerful method of managing virtualization in RHEL 8. Prominent CLI commands for virtualization management include:
virsh - A versatile virtualization command-line utility and shell with a great variety of purposes, depending on the provided arguments. For example:
-
Starting and shutting down a virtual machine -
virsh startandvirsh shutdown -
Listing available virtual machines (VMs) -
virsh list -
Creating a virtual machine from a configuration file -
virsh create -
Entering a virtualization shell -
virsh
For more information, see the
virsh(1)man page.-
Starting and shutting down a virtual machine -
-
virt-install- A CLI utility for creating new virtual machines. For more information, see thevirt-install(1)man page. -
virt-xml- A utility for editing the configuration of a virtual machine. -
guestfish- A utility for examining and modifying virtual machine disk images. For more information, see theguestfish(1)man page.
For instructions on basic virtualization management with CLI, see Chapter 2, Getting started with virtualization in RHEL 8.
Graphical interfaces
You can use the following GUIs to manage virtualization in RHEL 8:
The RHEL 8 web console, also known as Cockpit, provides a remotely accessible and easy to use graphical user interface for managing VMs and virtualization hosts.
For instructions on basic virtualization management with the web console, see Chapter 5, Using the RHEL 8 web console for managing virtual machines.
The Virtual Machine Manager (virt-manager) application provides a specialized GUI for managing VMs and virtualization hosts.
ImportantAlthough still supported in RHEL 8, virt-manager has been deprecated. The RHEL 8 web console is intended to become its replacement in a subsequent release. It is, therefore, recommended that you get familiar with the web console for managing virtualization in a GUI. However, in RHEL 8, some features may only be accessible from either virt-manager or the command line.
The Gnome Boxes application is a lightweight graphical interface to view and access VMs and remote systems. Gnome Boxes is primarily designed for use on desktop systems.
ImportantGnome Boxes is provided as a part of the GNOME desktop environment and is supported on RHEL 8, but Red Hat recommends that you use the web console for managing virtualization in a GUI.
1.5. Red Hat virtualization solutions
The following Red Hat products are built on top of RHEL 8 virtualization features and expand the KVM virtualization capabilities available in RHEL 8. In addition, many limitations of RHEL 8 virtualization do not apply to these products:
- Red Hat Virtualization (RHV)
RHV is designed for enterprise-class scalability and performance, and enables management of your entire virtual infrastructure, including hosts, virtual machines, networks, storage, and users from a centralized graphical interface.
For information about the differences between virtualization in Red Hat Enterprise Linux and Red Hat Virtualization, see the Red Hat Customer Portal.
Red Hat Virtualization can be used by enterprises running large deployments or mission-critical applications. Examples of large deployments suited to Red Hat Virtualization include databases, trading platforms, and messaging systems that must run continuously without any downtime.
For more information about Red Hat Virtualization, see the Red Hat Customer Portal or the Red Hat Virtualization documentation suite.
To download a fully supported 60-day evaluation version of Red Hat Virtualization, see https://access.redhat.com/products/red-hat-virtualization/evaluation
- Red Hat OpenStack Platform (RHOSP)
Red Hat OpenStack Platform offers an integrated foundation to create, deploy, and scale a secure and reliable public or private OpenStack cloud.
For more information about Red Hat OpenStack Platform, see the Red Hat Customer Portal or the Red Hat OpenStack Platform documentation suite.
To download a fully supported 60-day evaluation version of Red Hat OpenStack Platform, see https://access.redhat.com/products/red-hat-openstack-platform/evaluation
In addition, specific Red Hat products provide operating-system-level virtualization, also known as containerization:
- Containers are isolated instances of the host OS and operate on top of an existing OS kernel. For more information on containers, see the Red Hat Customer Portal.
- Containers do not have the versatility of KVM virtualization, but are more lightweight and flexible to handle. For a more detailed comparison, see the Introduction to Linux Containers.
Chapter 2. Getting started with virtualization in RHEL 8
To start using virtualization in RHEL 8, follow the steps below. The default method for this is the command-line interface (CLI), but for user convenience, some of the steps can be completed in the the web console GUI.
- Enable the virtualization module and install the virtualization packages - see Section 2.1, “Enabling virtualization in RHEL 8”.
Create a guest virtual machine:
Start the guest virtual machine:
Connect to the guest virtual machine:
The web console currently provides only a subset of guest management functions for virtual machines, so using the command line is recommended for advanced use of virtualization in RHEL 8.
2.1. Enabling virtualization in RHEL 8
To use virtualization in RHEL 8, you must enable the virtualization module, install virtualization packages, and ensure your system is configured to host virtual machines.
Prerequisites
- Red Hat Enterprise Linux 8 must be installed and registered on your host machine.
Your system must meet the following hardware requirements to work as a virtualization host:
- The architecture of your host machine supports KVM virtualization.
The following system resources are available, or more:
- 6 GB free disk space for the host, plus another 6 GB for each intended guest
- 2 GB of RAM for the host, plus another 2 GB for each intended guest
Procedure
Install the packages in the virtualization module:
# yum module install virtInstall the
virt-installpackage:# yum install virt-installVerify that your system is prepared to be a virtualization host:
# virt-host-validate
[...]
QEMU: Checking for device assignment IOMMU support         : PASS
QEMU: Checking if IOMMU is enabled by kernel               : WARN (IOMMU appears to be disabled in kernel. Add intel_iommu=on to kernel cmdline arguments)
LXC: Checking for Linux >= 2.6.26                          : PASS
[...]
LXC: Checking for cgroup 'blkio' controller mount-point    : PASS
LXC: Checking if device /sys/fs/fuse/connections exists    : FAIL (Load the 'fuse' module to enable /proc/ overrides)
If all virt-host-validate checks return a
PASSvalue, your system is prepared for creating virtual machines.If any of the checks return a
FAILvalue, follow the displayed instructions to fix the problem.If any of the checks return a
WARNvalue, consider following the displayed instructions to improve virtualization capabilities.
Additional information
Note that if virtualization is not supported by your host CPU, virt-host-validate generates the following output:
QEMU: Checking for hardware virtualization: FAIL (Only emulated CPUs are available, performance will be significantly limited)
However, attempting to create virtual machines on such a host system will fail, rather than have performance problems.
2.2. Creating virtual machines
To create a virtual machine (VM) in RHEL 8, use the command line interface or the the RHEL 8 web console.
2.2.1. Prerequisites
- Virtualization must be installed and enabled on your system.
- Prior to creating VMs on your system, consider the amount of system resources you need to allocate to your VMs, such as disk space, RAM, or CPUs. The recommended values may vary significantly depending on the intended tasks and workload of the VMs.
2.2.2. Creating virtual machines using the command-line interface
To create a virtual machine (VM) on your RHEL 8 host using the virt-install utility, follow the instructions below.
Prerequisites
An operating system (OS) installation source, which can be one of the following, and can be available locally or on a network:
- An ISO image of an installation medium
- A disk image of an existing virtual machine installation
- Optionally, a Kickstart file can also be provided for faster and easier configuration of the installation.
Procedure
To create a VM and start its OS installation, use the virt-install command. In its arguments, specify at minimum:
- The name of the new machine
- The amount of allocated memory
- The number of allocated virtual CPUs (vCPUs)
- The type and size of allocated storage
- The type and location of the OS installation source
Based on the chosen installation method, the necessary options and values can vary. See below for examples:
The following creates a VM named demo-guest1 that installs the Windows 10 OS from an ISO image locally stored in the /home/username/Downloads/Win10install.iso file. This VM is also allocated with 2048 MiB of RAM, 2 vCPUs, and a 8 GiB qcow2 virtual disk is automatically configured for the VM.
# virt-install --name demo-guest1 --memory 2048 --vcpus 2 --disk size=8 --os-variant win10 --cdrom /home/username/Downloads/Win10install.isoThe following creates a VM named demo-guest2 that uses the /home/username/Downloads/rhel8.iso image to run a RHEL 8 OS from a live CD. No disk space is assigned to this VM, so changes made during the session will not be preserved. In addition, the VM is allocated with 4096 MiB of RAM and 4 vCPUs.
# virt-install --name demo-guest2 --memory 4096 --vcpus 4 --disk none --livecd --os-variant rhel8.0 --cdrom /home/username/Downloads/rhel8.isoThe following creates a RHEL 8 VM named demo-guest3 connects to an existing disk image, /home/username/backup/disk.qcow2. This is similar to physically moving a hard drive between machines, so the OS and data available to demo-guest3 are determined by how the image was handled previously. In addition, this VM is allocated with 2048 MiB of RAM and 2 vCPUs.
# virt-install --name demo-guest3 --memory 2048 --vcpus 2 --os-variant rhel8.0 --import --disk /home/username/backup/disk.qcow2Note that the
--os-variantoption is highly recommended when importing a disk image. If it is not provided, the performance of the created VM will be negatively affected.The following creates a VM named demo-guest4 that installs from the
http://example.com/OS-installURL. For the installation to start successfully, the URL must contain a working OS installation tree. In addition, the OS is automatically configured using the /home/username/ks.cfg kickstart file. This VM is also allocated with 2048 MiB of RAM, 2 vCPUs, and a 16 GiB qcow2 virtual disk.# virt-install --name demo-guest4 --memory 2048 --vcpus 2 --disk size=16 --os-variant rhel8.0 --location http://example.com/OS-install --initrd-inject /home/username/ks.cfg --extra-args="ks=file:/ks.cfg console=tty0 console=ttyS0,115200n8"The following creates a VM named demo-guest5 that installs from a
RHEL8.isofile in text-only mode, without graphics. It connects the guest console to the serial console. The VM has 16384 MiB of memory, 16 vCPUs, and 280 GiB disk. This kind of installation is useful when connecting to a host over a slow network link.# virt-install --name demo-guest5 --memory 16384 --vcpus 16 --disk size=280 --os-variant rhel8.0 --location RHEL8.iso --nographics --extra-args='console=ttyS0'The following creates a VM named demo-guest6, which has the same configuration as demo-guest5, but resides on the 10.0.0.1 remote host.
# virt-install --connect qemu+ssh://root@10.0.0.1/system --name demo-guest6 --memory 16384 --vcpus 16 --disk size=280 --os-variant rhel8.0 --location RHEL8.iso --nographics --extra-args='console=ttyS0'
If the the VM is created successfully, a virt-viewer window opens with a graphical console of the VM and starts the guest OS installation.
A number of other options can be specified for virt-install to further configure the VM and its OS installation. For details, see the virt-install man page.
2.2.3. Creating virtual machines using the RHEL 8 web console
To create a VM on the host machine to which the web console is connected, follow the instructions below.
Prerequisites
To be able to use the RHEL 8 web console to manage virtual machines, you must install the web console virtual machine plug-in.
If the web console plug-in is not installed, see Section 5.2, “Setting up the RHEL 8 web console to manage virtual machines” for information about installing the web console virtual machine plug-in.
- Before creating VMs, consider the amount of system resources you need to allocate to your VMs, such as disk space, RAM, or CPUs. The recommended values may vary significantly depending on the intended tasks and workload of the VMs.
A locally available operating system (OS) installation source, which can be one of the following:
- An ISO image of an installation medium
- A disk image of an existing guest installation
Procedure
Click in the Virtual Machines interface of the RHEL 8 web console.
The Create New Virtual Machine dialog appears.

Enter the basic configuration of the virtual machine you want to create.
- Connection - The connection to the host to be used by the virtual machine.
- Name - The name of the virtual machine.
- Installation Source Type - The type of the installation source: Filesystem, URL
- Installation Source - The path or URL that points to the installation source.
- OS Vendor - The vendor of the virtual machine’s operating system.
- Operating System - The virtual machine’s operating system.
- Memory - The amount of memory with which to configure the virtual machine.
- Storage Size - The amount of storage space with which to configure the virtual machine.
- Immediately Start VM - Whether or not the virtual machine will start immediately after it is created.
Click .
The virtual machine is created. If the Immediately Start VM checkbox is selected, the VM will immediately start and begin installing the guest operating system.
You must install the operating system the first time the virtual machine is run.
Additional resources
- For information on installing an operating system on a virtual machine, see Section 5.3.2, “Installing operating systems using the RHEL 8 web console”.
2.3. Starting virtual machines
To start a virtual machine (VM) in RHEL 8, you can use the command line interface or the web console GUI.
2.3.1. Prerequisites
- Before a VM can be started, it must be created and ideally also installed with an OS. For instruction to do so, see Section 2.2, “Creating virtual machines”.
2.3.2. Starting a virtual machine using the command-line interface
To start a local VM using the command-line interface, use the
virsh startcommand:# virsh start demo-guest1 Domain demo-guest1 startedIf the VM is on a remote host, use QEMU+SSH connection to the host. For example, the following starts the
demo-guest1VM on the 192.168.123.123 host:# virsh -c qemu+ssh://root@192.168.123.123/system start demo-guest1 root@192.168.123.123's password: Last login: Mon Feb 18 07:28:55 2019 Domain demo-guest1 startedNote that managing VMs on remote host can be simplified by modifying your libvirt and SSH configuration.
2.3.3. Powering up virtual machines in the RHEL 8 web console
If a VM is in the shut off state, you can start it using the RHEL 8 web console.
Prerequisites
To be able to use the RHEL 8 web console to manage virtual machines, you must install the web console virtual machine plug-in.
If the web console plug-in is not installed, see Section 5.2, “Setting up the RHEL 8 web console to manage virtual machines” for information about installing the web console virtual machine plug-in.
Procedure
-
Click a row with the name of the virtual machine you want to start.
The row expands to reveal the Overview pane with basic information about the selected virtual machine and controls for shutting down and deleting the virtual machine. -
Click .
The virtual machine starts.
Additional resources
- For information on shutting down a virtual machine, see Section 5.5.2, “Powering down virtual machines in the RHEL 8 web console”.
- For information on restarting a virtual machine, see Section 5.5.3, “Restarting virtual machines using the RHEL 8 web console”.
- For information on sending a non-maskable interrupt to a virtual machine, see Section 5.5.4, “Sending non-maskable interrupts to VMs using the RHEL 8 web console”.
2.4. Connecting to virtual machines
To interact with a virtual machine (VM) in RHEL 8, you need to connect to it by doing one of the following:
- When using the RHEL 8 web console interface, use the Virtual Machines pane in the web console interface. For more information, see Section 2.4.2, “Viewing the virtual machine graphical console in the RHEL 8 web console”
- If you need to interact with a VM graphical display without using the RHEL 8 web console, use the Virt Viewer application. For details, see Section 2.4.3, “Opening a virtual machine graphical console using Virt Viewer”
- When a graphical display is not possible or not necessary, use an SSH terminal connection.
- When the virtual machine is not reachable from your system by using a network, use the virsh console.
If the VMs to which you are connecting are on a remote host rather than a local one, you can optionally also configure your system for more convenient access to remote hosts.
2.4.1. Prerequisites
2.4.2. Viewing the virtual machine graphical console in the RHEL 8 web console
You can view the graphical console of a selected virtual machine in the RHEL 8 web console. The virtual machine console shows the graphical output of the virtual machine.
Prerequisites
To be able to use the RHEL 8 web console to manage virtual machines, you must install the web console virtual machine plug-in.
If the web console plug-in is not installed, see Section 5.2, “Setting up the RHEL 8 web console to manage virtual machines” for information about installing the web console virtual machine plug-in.
- Ensure that both the host and the VM support a graphical interface.
Procedure
-
Click a row with the name of the virtual machine whose graphical console you want to view.
The row expands to reveal the Overview pane with basic information about the selected virtual machine and controls for shutting down and deleting the virtual machine. -
Click .
The graphical console appears in the web interface.

You can interact with the virtual machine console using the mouse and keyboard in the same manner you interact with a real machine. The display in the virtual machine console reflects the activities being performed on the virtual machine.
The server on which the RHEL 8 web console is running can intercept specific key combinations, such as Ctrl+Alt+F1, preventing them from being sent to the virtual machine.
To send such key combinations, click the menu and select the key sequence to send.
For example, to send the Ctrl+Alt+F1 combination to the virtual machine, click the menu and select the menu entry.
Additional Resources
- For details on viewing the graphical console in a remote viewer, see Section 5.10.2, “Viewing virtual machine consoles in remote viewers using the RHEL 8 web console”.
- For details on viewing the serial console in the RHEL 8 web console, see Section 5.10.3, “Viewing the virtual machine serial console in the RHEL 8 web console”.
2.4.3. Opening a virtual machine graphical console using Virt Viewer
To connect to a graphical console of a KVM virtual machine (VM) and open it in the Virt Viewer desktop application, follow the procedure below.
Prerequisites
- Your system, as well as the virtual machine you are connecting to, must support graphical displays.
- If the target VM is located on a remote host, connection and root access privileges to the host are needed.
- [Optional] If the target VM is located on a remote host, set up your libvirt and SSH for more convenient access to remote hosts.
Procedure
To connect to a local VM, use the following command and replace guest-name with the name of the VM you want to connect to:
# virt-viewer guest-nameTo connect to a remote VM, use the
virt-viewercommand with the SSH protocol. For example, the following command connects as root to a VM called guest-name, located on remote system 10.0.0.1. The connection also requires root authentication for 10.0.0.1.# virt-viewer --direct --connect qemu+ssh://root@10.0.0.1/system guest-name root@10.0.0.1's password:
If the connection works correctly, the VM display is shown in the Virt Viewer window.

You can interact with the VM console using the mouse and keyboard in the same manner you interact with a real machine. The display in the VM console reflects the activities being performed on the VM.
Additional resources
-
For more information on using Virt Viewer, see the
virt-viewerman page. - Connecting to VMs on a remote host can be simplified by modifying your libvirt and SSH configuration.
- For management of virtal machines in an interactive GUI in RHEL 8, you can use the web console interface. For more information, see Section 5.10, “Interacting with virtual machines using the RHEL 8 web console”.
2.4.4. Connecting to a virtual machine using SSH
To interact with the terminal of a virtual machine (VM) using the SSH connection protocol, follow the procedure below:
Prerequisites
- Network connection and root access privileges to the target VM.
The
libvirt-nsscomponent must be installed and enabled on the VM’s host. If it is not, do the following:Install the
libvirt-nsspackage:# yum install libvirt-nssEdit the
/etc/nsswitch.conffile and addlibvirt_guestto thehostsline:[...] passwd: compat shadow: compat group: compat hosts: files libvirt_guest dns [...]
- If the target VM is located on a remote host, connection and root access privileges to the host are also needed.
Procedure
Optional: When connecting to a remote guest, SSH into its physical host first. The following example demonstrates connecting to a host machine 10.0.0.1 using its root credentials:
# ssh root@10.0.0.1
root@10.0.0.1's password:
Last login: Mon Sep 24 12:05:36 2018
root~#
Use the VM’s name and user access credentials to connect to it. For example, the following connects to to the "testguest1" VM using its root credentials:
# ssh root@testguest1 root@testguest1's password: Last login: Wed Sep 12 12:05:36 2018 root~]#NoteIf you do not know the virtual machine’s name, you can list all VMs available on the host using the
virsh list --allcommand:# virsh list --all Id Name State ---------------------------------------------------- 2 testguest1 running - testguest2 shut off
2.4.5. Opening a virtual machine serial console
Using the virsh console command, it is possible to connect to the serial console of a virtual machine (VM).
This is useful when the VM:
- Does not provide VNC or SPICE protocols, and thus does not offer video display for GUI tools.
- Does not does not have network connection, and thus cannot be interacted with using SSH.
Prerequisites
The VM must have the serial console configured in its kernel command line. To verify this, the
cat /proc/cmdlinecommand output on the VM should include console=ttyS0. For example:# cat /proc/cmdline BOOT_IMAGE=/vmlinuz-3.10.0-948.el7.x86_64 root=/dev/mapper/rhel-root ro console=tty0 console=ttyS0,9600n8 rd.lvm.lv=rhel/root rd.lvm.lv=rhel/swap rhgbIf the serial console is not set up properly on a VM, using virsh console to connect to the VM connects you to an unresponsive guest console. However, you can still exit the unresponsive console by using the Ctrl+] shortcut.
To set up serial console on the VM, do the following:
-
On the VM, edit the
/etc/default/grubfile and add console=ttyS0 to the line that starts with GRUB_CMDLINE_LINUX. Clear the kernel options that may prevent your changes from taking effect
# grub2-editenv - unset kerneloptsReload the Grub configuration:
# grub2-mkconfig -o /boot/grub2/grub.cfg Generating grub configuration file ... Found linux image: /boot/vmlinuz-3.10.0-948.el7.x86_64 Found initrd image: /boot/initramfs-3.10.0-948.el7.x86_64.img [...] done- Reboot the VM.
-
On the VM, edit the
Procedure
On your host system, use the
virsh consolecommand. The following example connects to the guest1 virtual machine, if the libvirt driver supports safe console handling:# virsh console guest1 --safe Connected to domain guest1 Escape character is ^] Subscription-name Kernel 3.10.0-948.el7.x86_64 on an x86_64 localhost login:
- You can interact with the virsh console in the same way as with a standard command-line interface.
Additional resources
- For more information about the VM serial console, see the virsh man page.
2.4.6. Setting up easy access to remote virtualization hosts
When managing VMs on a remote host system using libvirt utilities, it is recommended to use the -c qemu+ssh://root@hostname/system syntax. For example, to use the virsh list command as root on the 10.0.0.1 host:
# virsh -c qemu+ssh://root@10.0.0.1/system list

root@10.0.0.1's password:
Last login: Mon Feb 18 07:28:55 2019

Id   Name              State
---------------------------------
1    remote-guest      running
However, for convenience, you can remove the need to specify the connection details in full by modifying your SSH and libvirt configuration. For example, you will be able to do:
# virsh -c remote-host list

root@10.0.0.1's password:
Last login: Mon Feb 18 07:28:55 2019

Id   Name              State
---------------------------------
1    remote-guest      running
To enable this improvement, follow the instructions below.
Procedure
Edit or create the
~/.ssh/configfile and add the following to it, where host-alias is a shortened name associated with a specific remote host, and hosturl is the URL address of the host.Host host-alias User root Hostname hosturl
For example, the following sets up the tyrannosaurus alias for root@10.0.0.1:
Host tyrannosaurus
        User                    root
        Hostname                10.0.0.1
Edit or create the
/etc/libvirt/libvirt.conffile, and add the following, where qemu-host-alias is a host alias that QEMU and libvirt utilities will associate with the intended host:uri_aliases = [ "qemu-host-alias=qemu+ssh://host-alias/system", ]
For example, the following uses the tyrannosaurus alias configured in the previous step to set up the t-rex alias, which stands for
qemu+ssh://10.0.0.1/system:uri_aliases = [ "t-rex=qemu+ssh://tyrannosaurus/system", ]
As a result, you can manage remote VMs by using libvirt-based utilities on the local system and adding add
-c qemu-host-aliasto the commands. This automatically performs the commands over SSH on the remote host.For example, the following lists VMs on the 10.0.0.1 remote host, the connection to which was set up as t-rex in the previous steps:
$ virsh -c t-rex list

root@10.0.0.1's password:
Last login: Mon Feb 18 07:28:55 2019

Id   Name              State
---------------------------------
1    velociraptor      running
[Optional] If you want to use libvirt utilities exclusively on a single remote host, you can also set a specific connection as the default target for libvirt-based utilities. To do so, edit the
/etc/libvirt/libvirt.conffile and set the value of theuri_defaultparameter to qemu-host-alias. For example, the following uses the t-rex host alias set up in the previous steps as a default libvirt target.# These can be used in cases when no URI is supplied by the application # (@uri_default also prevents probing of the hypervisor driver). # uri_default = "t-rex"
As a result, all libvirt-based commands will automatically be performed on the specified remote host.
$ virsh list
root@10.0.0.1's password:
Last login: Mon Feb 18 07:28:55 2019

Id   Name              State
---------------------------------
1    velociraptor      running
However, this is not recommended if you also want to manage VMs on your local host or on different remote hosts.
Additional resources
When connecting to a remote host, it is also possible to avoid having to provide the root password to the remote system. To do so, do one or more of the following:
- Set up key-based SSH access to the remote host.
- Use SSH connection multiplexing to connect to the remote system.
- Set up a kerberos authentication ticket on the remote system.
Utilities that can use the
-c(or--connect) option and the remote host access configuration described above include:- virt-install
- virt-viewer
- virsh
- virt-manager
2.5. Shutting down virtual machines
To shut down a running virtual machine in Red Hat Enterprise Linux 8, use the command line interface or the web console GUI.
2.5.1. Shutting down a virtual machine using the command-line interface
To shut down a responsive virtual machine (VM), do one of the following:
- use a shutdown command appropriate to the guest OS while connected to the guest
use the
virsh shutdowncommand on the host:If the VM is on a local host:
# virsh shutdown demo-guest1
Domain demo-guest1 is being shutdown
If the VM is on a remote host, in this example 10.0.0.1:
# virsh -c qemu+ssh://root@10.0.0.1/system shutdown demo-guest1

root@10.0.0.1's password:
Last login: Mon Feb 18 07:28:55 2019
Domain demo-guest1 is being shutdown
To force a guest to shut down, for example if it has become unresponsive, use the virsh destroy command on the host:
# virsh destroy demo-guest1
Domain demo-guest1 destroyed
The virsh destroy command does not actually delete or remove the guest configuration or disk images. It only destroys the running guest instance. However, in rare cases, this command may cause corruption of the guest’s file system, so using virsh destroy is only recommended if all other shutdown methods have failed.
2.5.2. Powering down virtual machines in the RHEL 8 web console
If a virtual machine is in the running state, you can shut it down using the RHEL 8 web console.
Prerequisites
To be able to use the RHEL 8 web console to manage virtual machines, you must install the web console virtual machine plug-in.
If the web console plug-in is not installed, see Section 5.2, “Setting up the RHEL 8 web console to manage virtual machines” for information about installing the web console virtual machine plug-in.
Procedure
-
Click a row with the name of the virtual machine you want to shut down.
The row expands to reveal the Overview pane with basic information about the selected virtual machine and controls for shutting down and deleting the virtual machine. -
Click .
The virtual machine shuts down.
If the virtual machine does not shut down, click the arrow next to the button and select .
Additional resources
- For information on starting a virtual machine, see Section 5.5.1, “Powering up virtual machines in the RHEL 8 web console”.
- For information on restarting a virtual machine, see Section 5.5.3, “Restarting virtual machines using the RHEL 8 web console”.
- For information on sending a non-maskable interrupt to a virtual machine, see Section 5.5.4, “Sending non-maskable interrupts to VMs using the RHEL 8 web console”.
Chapter 3. Getting started with virtualization in RHEL 8 on IBM POWER
When using RHEL 8 on IBM POWER8 or POWER9 hardware, it is possible to use KVM virtualization. However, when enabling the KVM hypervisor on your system, extra steps are needed compared to virtualization on AMD64 and Intel64 architectures. Certain RHEL 8 virtualization features also have different or restricted functionality on IBM POWER.
Apart from the information in the following sections, using virtualization on IBM POWER works the same as on AMD64 and Intel 64. Therefore, you can see other RHEL 8 virtualization documentation for more information about using virtualization on IBM POWER.
3.1. Enabling virtualization on IBM POWER
To set up a KVM hypervisor and be able to create virtual machines (VMs) on an IBM POWER8 or IBM POWER9 system running RHEL 8, follow the instructions below.
Prerequisites
- RHEL 8 is installed and registered on your host machine.
The following system resources are available, or more:
- 6 GB free disk space for the host, plus another 6 GB for each intended guest.
- 2 GB of RAM for the host, plus another 2 GB for each intended guest.
Your CPU machine type must support IBM POWER virtualization.
To verify this, query the platform information in your
/proc/cpuinfofile.# grep ^platform /proc/cpuinfo/ platform : PowerNVIf the output of this command includes the
PowerNVentry, you are running a PowerNV machine type and can use virtualization on IBM POWER.
Procedure
Load the KVM-HV kernel module
# modprobe kvm_hvVerify that the KVM kernel module is loaded
# lsmod | grep kvmIf KVM loaded successfully, the output of this command includes
kvm_hv.Install the packages in the virtualization module:
# yum module install virtInstall the
virt-installpackage:# yum install virt-installVerify that your system is prepared to be a virtualization host:
# virt-host-validate
[...]
QEMU: Checking if device /dev/vhost-net exists                          : PASS
QEMU: Checking if device /dev/net/tun exists                            : PASS
QEMU: Checking for cgroup 'memory' controller support                   : PASS
QEMU: Checking for cgroup 'memory' controller mount-point               : PASS
[...]
QEMU: Checking for cgroup 'blkio' controller support                    : PASS
QEMU: Checking for cgroup 'blkio' controller mount-point                : PASS
QEMU: Checking if IOMMU is enabled by kernel                            : PASS
If all virt-host-validate checks return a
PASSvalue, your system is prepared for creating virtual machines.If any of the checks return a
FAILvalue, follow the displayed instructions to fix the problem.If any of the checks return a
WARNvalue, consider following the displayed instructions to improve virtualization capabilities.
Additional information
Note that if virtualization is not supported by your host CPU, virt-host-validate generates the following output:
QEMU: Checking for hardware virtualization: FAIL (Only emulated CPUs are available, performance will be significantly limited)
However, attempting to create VMs on such a host system will fail, rather than have performance problems.
3.2. How virtualization on IBM POWER differs from AMD64 and Intel 64
KVM virtualization in RHEL 8 on IBM POWER systems is different from KVM on AMD64 and Intel 64 systems in a number of aspects, notably:
- Memory requirements
- VMs on IBM POWER consume more memory. Therefore, the recommended minimum memory allocation for a virtual machine (VM) on an IBM POWER host is 2GB RAM.
- Display protocols
The SPICE protocol is not supported on IBM POWER systems. To display the graphical output of a VM, use the
VNCprotocol. In addition, only the following virtual graphics card devices are supported:-
vga- only supported in-vga stdmode and not in-vga cirrusmode. -
virtio-vga -
virtio-gpu
-
- SMBIOS
- SMBIOS configuration is not available
- Memory allocation errors
POWER8 VMs, including compatibility mode VMs, may fail with an error similar to:
qemu-kvm: Failed to allocate KVM HPT of order 33 (try smaller maxmem?): Cannot allocate memory
This is significantly more likely to occur on VMs that use RHEL 7.3 and prior as the guest OS.
To fix the problem, increase the CMA memory pool available for the guest’s hashed page table (HPT) by adding
kvm_cma_resv_ratio=memoryto the host’s kernel command line, where memory is the percentage of the host memory that should be reserved for the CMA pool (defaults to 5).- Huge pages
Transparent huge pages (THPs) do not provide any notable performance benefits on IBM POWER8 VMs. However, IBM POWER9 VMs can benefit from THPs as expected.
In addition, the size of static huge pages on IBM POWER8 systems are 16 MiB and 16 GiB, as opposed to 2 MiB and 1 GiB on AMD64, Intel 64, and IBM POWER9. As a consequence, to migrate a VM configured with static huge pages from an IBM POWER8 host to an IBM POWER9 host, you must first set up 1GiB huge pages on the VM.
- kvm-clock
-
The
kvm-clockservice does not have to be configured for time management in VMs on IBM POWER9. - pvpanic
IBM POWER9 systems do not support the
pvpanicdevice. However, an equivalent functionality is available and activated by default on this architecture. To enable it in a VM, use the<on_crash>XML configuration element with thepreservevalue.In addition, make sure to remove the
<panic>element from the<devices>section, as its presence can lead to the VM failing to boot on IBM POWER systems.- Single-threaded host
- On IBM POWER8 systems, the host machine must run in single-threaded mode to support VMs. This is automatically configured if the qemu-kvm packages are installed. However, VMs running on single-threaded hosts can still use multiple threads.
- Peripheral devices
A number of peripheral devices supported on AMD64 and Intel 64 systems are not supported on IBM POWER systems, or a different device is supported as a replacement.
-
Devices used for PCI-E hierarchy, including
ioh3420andxio3130-downstream, are not supported. This functionality is replaced by multiple independent PCI root bridges provided by thespapr-pci-host-bridgedevice. - UHCI and EHCI PCI controllers are not supported. Use OHCI and XHCI controllers instead.
-
IDE devices, including the virtual IDE CD-ROM (
ide-cd) and the virtual IDE disk (ide-hd), are not supported. Use thevirtio-scsiandvirtio-blkdevices instead. -
Emulated PCI NICs (
rtl8139) are not supported. Use thevirtio-netdevice instead. -
Sound devices, including
intel-hda,hda-output, andAC97, are not supported. -
USB redirection devices, including
usb-redirandusb-tablet, are not supported.
-
Devices used for PCI-E hierarchy, including
- v2v and p2v
-
The
virt-v2vandvirt-p2vutilities are only supported on the AMD64 and Intel 64 architecture. Because of this, they are not provided on IBM POWER.
Chapter 4. Getting started with virtualization in RHEL 8 on IBM Z
When using RHEL 8 on IBM Z hardware, it is possible to use KVM virtualization. However, when enabling the KVM hypervisor on your system, extra steps are needed compared to virtualization on AMD64 and Intel 64 architectures. Certain RHEL 8 virtualization features also have different or restricted functionality on IBM Z.
Apart from the information in the following sections, using virtualization on IBM Z works the same as on AMD64 and Intel 64. Therefore, you can see other RHEL 8 virtualization documentation for more information about using virtualization on IBM Z.
4.1. Enabling virtualization on IBM Z
To set up a KVM hypervisor and be able to create virtual machines (VMs) on an IBM Z system running RHEL 8, follow the instructions below.
Prerequisites
- RHEL 8 is installed and registered on your host machine.
The following system resources are available, or more:
- 6 GB free disk space for the host, plus another 6 GB for each intended guest.
- 2 GB of RAM for the host, plus another 2 GB for each intended guest.
- Your IBM Z host system needs to use a z13 CPU or later.
RHEL 8 has to be installed on a logical partition (LPAR). In addition, the LPAR must support the start-interpretive execution (SIE) virtualization functions.
To verify this, search for
siein your/proc/cpuinfofile.# grep sie /proc/cpuinfo/ features : esan3 zarch stfle msa ldisp eimm dfp edat etf3eh highgprs te sie
Procedure
Load the KVM kernel module:
# modprobe kvmVerify that the KVM kernel module is loaded:
# lsmod | grep kvmIf KVM loaded successfully, the output of this command includes
kvm:Install the packages in the virtualization module:
# yum module install virtInstall the
virt-installpackage:# yum install virt-installVerify that your system is prepared to be a virtualization host:
# virt-host-validate
[...]
QEMU: Checking if device /dev/kvm is accessible                : PASS
QEMU: Checking if device /dev/vhost-net exists                 : PASS
QEMU: Checking if device /dev/net/tun exists                   : PASS
QEMU: Checking for cgroup 'memory' controller support          : PASS
QEMU: Checking for cgroup 'memory' controller mount-point      : PASS
[...]
If all virt-host-validate checks return a
PASSvalue, your system is prepared for creating virtual machines.If any of the checks return a
FAILvalue, follow the displayed instructions to fix the problem.If any of the checks return a
WARNvalue, consider following the displayed instructions to improve virtualization capabilities.
Additional information
Note that if virtualization is not supported by your host CPU, virt-host-validate generates the following output:
QEMU: Checking for hardware virtualization: FAIL (Only emulated CPUs are available, performance will be significantly limited)
However, attempting to create VMs on such a host system will fail, rather than have performance problems.
4.2. How virtualization on IBM Z differs from AMD64 and Intel 64
KVM virtualization in RHEL 8 on IBM Z systems differs from KVM on AMD64 and Intel 64 systems in the following:
- No graphical output
-
Displaying the VM graphical output is not possible when connecting to the VM using the VNC protocol. This is due to the
gnome-desktoputility not being supported on IBM Z. - PCI and USB devices
Virtual PCI and USB devices are not supported on IBM Z. This also means that
virtio-*-pcidevices are unsupported andvirtio-*-ccwdevices should be used instead. For example, usevirtio-net-ccwinstead ofvirtio-net-pci.Note that direct attachment of PCI devices, also known as PCI passthrough, is supported.
- Device boot order
IBM Z does not support the
<boot dev='device'>XML configuration element. To define device boot order, use the<boot order='number'>element in the<devices>section of the XML. For example:<devices> <disk type='file' snapshot='external'> <driver name="tap" type="aio" cache="default"/> <source file='/var/lib/xen/images/fv0' startupPolicy='optional'> <seclabel relabel='no'/> </source> <target dev='hda' bus='ide'/> <iotune> <total_bytes_sec>10000000</total_bytes_sec> <read_iops_sec>400000</read_iops_sec> <write_iops_sec>100000</write_iops_sec> </iotune> <boot order='2'/> [...] </disk>NoteUsing
<boot order='number'>for boot order management is preferred also on AMD64 and Intel 64 hosts.- vfio-ap
- VMs on an IBM Z host can use the vfio-ap cryptographic device passthrough, which is not supported on any other architectures.
- SMBIOS
- SMBIOS configuration is not available on IBM Z.
- Watchdog devices
If using watchdog devices in your VM on an IBM Z host, use the
diag288model. For example:<devices> <watchdog model='diag288' action='poweroff'/> </devices>
- kvm-clock
-
The
kvm-clockservice is specific to AMD64 and Intel 64 systems, and does not have to be configured for VM time management on IBM Z. - v2v and p2v
-
The
virt-v2vandvirt-p2vutilities are only supported on the AMD64 and Intel 64 architecture. Because of this, they are not provided on IBM Z.
Chapter 5. Using the RHEL 8 web console for managing virtual machines
To manage virtual machines in a graphical interface, you can use the Virtual Machines pane in the RHEL 8 web console.

The following sections describe the web console’s virtualization management capabilities and provide instructions for using them.
5.1. Overview of virtual machine management using the RHEL 8 web console
The RHEL 8 web console is a web-based interface for system administration. With the installation of a web console plug-in, the web console can be used to manage virtual machines (VMs) on the servers to which the web console can connect. It provides a graphical view of VMs on a host system to which the web console can connect, and allows monitoring system resources and adjusting configuration with ease.
Using the RHEL 8 web console for VM management, you can do the following:
- Create and delete VMs
- Install operating systems on VMs
- Run and shut down VMs
- View information about VMs
- Create and attach disks to VMs
- Configure virtual CPU settings for VMs
- Manage virtual network interfaces
- Interact with VMs using VM consoles
The Virtual Machine Manager (virt-manager) application is still supported in RHEL 8 but has been deprecated. The RHEL 8 web console is intended to become its replacement in a subsequent release. It is, therefore, recommended that you get familiar with the web console for managing virtualization in a GUI. However, in RHEL 8, some features may only be accessible from either virt-manager or the command line.
5.2. Setting up the RHEL 8 web console to manage virtual machines
Before using the RHEL 8 web console to manage VMs, you must install the web console virtual machine plug-in.
Prerequisites
Ensure that the web console is installed on your machine.
$ yum info cockpit
Installed Packages
Name         : cockpit
[...]
If the web console is not installed, see the Managing systems using the RHEL 8 web console guide for more information about installing the web console.
Procedure
Install the
cockpit-machinesplug-in.# yum install cockpit-machinesIf the installation is successful, appears in the web console side menu.

5.3. Creating virtual machines and installing guest operating systems using the RHEL 8 web console
The following sections provide information on how to use the RHEL 8 web console to create virtual machines (VMs) and install operating systems on VMs.
5.3.1. Creating virtual machines using the RHEL 8 web console
To create a VM on the host machine to which the web console is connected, follow the instructions below.
Prerequisites
To be able to use the RHEL 8 web console to manage virtual machines, you must install the web console virtual machine plug-in.
If the web console plug-in is not installed, see Section 5.2, “Setting up the RHEL 8 web console to manage virtual machines” for information about installing the web console virtual machine plug-in.
- Before creating VMs, consider the amount of system resources you need to allocate to your VMs, such as disk space, RAM, or CPUs. The recommended values may vary significantly depending on the intended tasks and workload of the VMs.
A locally available operating system (OS) installation source, which can be one of the following:
- An ISO image of an installation medium
- A disk image of an existing guest installation
Procedure
Click in the Virtual Machines interface of the RHEL 8 web console.
The Create New Virtual Machine dialog appears.
Enter the basic configuration of the virtual machine you want to create.
- Connection - The connection to the host to be used by the virtual machine.
- Name - The name of the virtual machine.
- Installation Source Type - The type of the installation source: Filesystem, URL
- Installation Source - The path or URL that points to the installation source.
- OS Vendor - The vendor of the virtual machine’s operating system.
- Operating System - The virtual machine’s operating system.
- Memory - The amount of memory with which to configure the virtual machine.
- Storage Size - The amount of storage space with which to configure the virtual machine.
- Immediately Start VM - Whether or not the virtual machine will start immediately after it is created.
Click .
The virtual machine is created. If the Immediately Start VM checkbox is selected, the VM will immediately start and begin installing the guest operating system.
You must install the operating system the first time the virtual machine is run.
Additional resources
- For information on installing an operating system on a virtual machine, see Section 5.3.2, “Installing operating systems using the RHEL 8 web console”.
5.3.2. Installing operating systems using the RHEL 8 web console
The first time a virtual machine loads, you must install an operating system on the virtual machine.
Prerequisites
Before using the RHEL 8 web console to manage virtual machines, you must install the web console virtual machine plug-in.
If the web console plug-in is not installed, see Section 5.2, “Setting up the RHEL 8 web console to manage virtual machines” for information about installing the web console virtual machine plug-in.
- A VM on which to install an operating system.
Procedure
-
Click .
The installation routine of the operating system runs in the virtual machine console.
If the Immediately Start VM checkbox in the Create New Virtual Machine dialog is checked, the installation routine of the operating system starts automatically when the virtual machine is created.
If the installation routine fails, the virtual machine must be deleted and recreated.
5.4. Deleting virtual machines using the RHEL 8 web console
You can delete a virtual machine and its associated storage files from the host to which the RHEL 8 web console is connected.
Prerequisites
To be able to use the RHEL 8 web console to manage virtual machines, you must install the web console virtual machine plug-in.
If the web console plug-in is not installed, see Section 5.2, “Setting up the RHEL 8 web console to manage virtual machines” for information about installing the web console virtual machine plug-in.
Procedure
In the Virtual Machines interface of the RHEL 8 web console, click the name of the VM you want to delete.
The row expands to reveal the Overview pane with basic information about the selected virtual machine and controls for shutting down and deleting the virtual machine.

Click .
A confirmation dialog appears.
- [Optional] To delete all or some of the storage files associated with the virtual machine, select the checkboxes next to the storage files you want to delete.
-
Click .
The virtual machine and any selected associated storage files are deleted.
5.5. Powering up and powering down virtual machines using the RHEL 8 web console
Using the RHEL 8 web console, you can run, shut down, and restart virtual machines. You can also send a non-maskable interrupt to a virtual machine that is unresponsive.
5.5.1. Powering up virtual machines in the RHEL 8 web console
If a VM is in the shut off state, you can start it using the RHEL 8 web console.
Prerequisites
To be able to use the RHEL 8 web console to manage virtual machines, you must install the web console virtual machine plug-in.
If the web console plug-in is not installed, see Section 5.2, “Setting up the RHEL 8 web console to manage virtual machines” for information about installing the web console virtual machine plug-in.
Procedure
-
Click a row with the name of the virtual machine you want to start.
The row expands to reveal the Overview pane with basic information about the selected virtual machine and controls for shutting down and deleting the virtual machine. -
Click .
The virtual machine starts.
Additional resources
- For information on shutting down a virtual machine, see Section 5.5.2, “Powering down virtual machines in the RHEL 8 web console”.
- For information on restarting a virtual machine, see Section 5.5.3, “Restarting virtual machines using the RHEL 8 web console”.
- For information on sending a non-maskable interrupt to a virtual machine, see Section 5.5.4, “Sending non-maskable interrupts to VMs using the RHEL 8 web console”.
5.5.2. Powering down virtual machines in the RHEL 8 web console
If a virtual machine is in the running state, you can shut it down using the RHEL 8 web console.
Prerequisites
To be able to use the RHEL 8 web console to manage virtual machines, you must install the web console virtual machine plug-in.
If the web console plug-in is not installed, see Section 5.2, “Setting up the RHEL 8 web console to manage virtual machines” for information about installing the web console virtual machine plug-in.
Procedure
-
Click a row with the name of the virtual machine you want to shut down.
The row expands to reveal the Overview pane with basic information about the selected virtual machine and controls for shutting down and deleting the virtual machine. -
Click .
The virtual machine shuts down.
If the virtual machine does not shut down, click the arrow next to the button and select .
Additional resources
- For information on starting a virtual machine, see Section 5.5.1, “Powering up virtual machines in the RHEL 8 web console”.
- For information on restarting a virtual machine, see Section 5.5.3, “Restarting virtual machines using the RHEL 8 web console”.
- For information on sending a non-maskable interrupt to a virtual machine, see Section 5.5.4, “Sending non-maskable interrupts to VMs using the RHEL 8 web console”.
5.5.3. Restarting virtual machines using the RHEL 8 web console
If a virtual machine is in the running state, you can restart it using the RHEL 8 web console.
Prerequisites
To be able to use the RHEL 8 web console to manage virtual machines, you must install the web console virtual machine plug-in.
If the web console plug-in is not installed, see Section 5.2, “Setting up the RHEL 8 web console to manage virtual machines” for information about installing the web console virtual machine plug-in.
Procedure
-
Click a row with the name of the virtual machine you want to restart.
The row expands to reveal the Overview pane with basic information about the selected virtual machine and controls for shutting down and deleting the virtual machine. -
Click .
The virtual machine shuts down and restarts.
If the virtual machine does not restart, click the arrow next to the button and select .
Additional resources
- For information on starting a virtual machine, see Section 5.5.1, “Powering up virtual machines in the RHEL 8 web console”.
- For information on shutting down a virtual machine, see Section 5.5.2, “Powering down virtual machines in the RHEL 8 web console”.
- For information on sending a non-maskable interrupt to a virtual machine, see Section 5.5.4, “Sending non-maskable interrupts to VMs using the RHEL 8 web console”.
5.5.4. Sending non-maskable interrupts to VMs using the RHEL 8 web console
Sending a non-maskable interrupt (NMI) may cause an unresponsive running VM to respond or shut down. For example, you can send the Ctrl+Alt+Del NMI to a VM that is not responsive.
Prerequisites
Before using the RHEL 8 web console to manage VMs, you must install the web console virtual machine plug-in.
If the web console plug-in is not installed, see Section 5.2, “Setting up the RHEL 8 web console to manage virtual machines” for information about installing the web console virtual machine plug-in.
Procedure
-
Click a row with the name of the virtual machine to which you want to send an NMI.
The row expands to reveal the Overview pane with basic information about the selected virtual machine and controls for shutting down and deleting the virtual machine. -
Click the arrow next to the button and select .
An NMI is sent to the virtual machine.
Additional resources
- For information on starting a virtual machine, see Section 5.5.1, “Powering up virtual machines in the RHEL 8 web console”.
- For information on restarting a virtual machine, see Section 5.5.3, “Restarting virtual machines using the RHEL 8 web console”.
- For information on shutting down a virtual machine, see Section 5.5.2, “Powering down virtual machines in the RHEL 8 web console”.
5.6. Viewing virtual machine information using the RHEL 8 web console
Using the RHEL 8 web console, you can view information about the virtual storage and VMs to which the web console is connected.
5.6.1. Viewing a virtualization overview in the RHEL 8 web console
The following describes how to view an overview of the available virtual storage and the VMs to which the web console session is connected.
Prerequisites
To be able to use the RHEL 8 web console to manage virtual machines, you must install the web console virtual machine plug-in.
If the web console plug-in is not installed, see Section 5.2, “Setting up the RHEL 8 web console to manage virtual machines” for information about installing the web console virtual machine plug-in.
Procedure
To view information about the available storage and the virtual machines to which the web console is attached.
-
Click in the web console’s side menu.
Information about the available storage and the virtual machines to which the web console session is connected appears.
The information includes the following:
- Storage Pools - The number of storage pools that can be accessed by the web console and their state.
- Networks - The number of networks that can be accessed by the web console and their state.
- Name - The name of the virtual machine.
- Connection - The type of libvirt connection, system or session.
- State - The state of the virtual machine.
Additional resources
- For information on viewing detailed information about the storage pools the web console session can access, see Section 5.6.2, “Viewing storage pool information using the RHEL 8 web console”.
- For information on viewing basic information about a selected virtual machine to which the web console session is connected, see Section 5.6.3, “Viewing basic virtual machine information in the RHEL 8 web console”.
- For information on viewing resource usage for a selected virtual machine to which the web console session is connected, see Section 5.6.4, “Viewing virtual machine resource usage in the RHEL 8 web console”.
- For information on viewing disk information about a selected virtual machine to which the web console session is connected, see Section 5.6.5, “Viewing virtual machine disk information in the RHEL 8 web console”.
- For information on viewing virtual network interface card information about a selected virtual machine to which the web console session is connected, see Section 5.6.6, “Viewing virtual NIC information in the RHEL 8 web console”.
5.6.2. Viewing storage pool information using the RHEL 8 web console
The following describes how to view detailed storage pool information about the storage pools that the web console session can access.
Prerequisites
To be able to use the RHEL 8 web console to manage virtual machines, you must install the web console virtual machine plug-in.
If the web console plug-in is not installed, see Section 5.2, “Setting up the RHEL 8 web console to manage virtual machines” for information about installing the web console virtual machine plug-in.
Procedure
To view storage pool information:
Click at the top of the Virtual Machines tab. The Storage Pools window appears showing a list of configured storage pools.

The information includes the following:
- Name - The name of the storage pool.
- Size - The size of the storage pool.
- Connection - The connection used to access the storage pool.
- State - The state of the storage pool.
Click a row with the name of the storage whose information you want to see.
The row expands to reveal the Overview pane with following information about the selected storage pool:
- Path - The path to the storage pool.
- Persistent - Whether or not the storage pool is persistent.
- Autostart - Whether or not the storage pool starts automatically.
- Type - The storage pool type.

To view a list of storage volumes created from the storage pool, click .
The Storage Volumes pane appears showing a list of configured storage volumes with their sizes and the amount of space used.

Additional resources
- For information on viewing information about all of the virtual machines to which the web console session is connected, see Section 5.6.1, “Viewing a virtualization overview in the RHEL 8 web console”.
- For information on viewing basic information about a selected virtual machine to which the web console session is connected, see Section 5.6.3, “Viewing basic virtual machine information in the RHEL 8 web console”.
- For information on viewing resource usage for a selected virtual machine to which the web console session is connected, see Section 5.6.4, “Viewing virtual machine resource usage in the RHEL 8 web console”.
- For information on viewing disk information about a selected virtual machine to which the web console session is connected, see Section 5.6.5, “Viewing virtual machine disk information in the RHEL 8 web console”.
- For information on viewing virtual network interface card information about a selected virtual machine to which the web console session is connected, see Section 5.6.6, “Viewing virtual NIC information in the RHEL 8 web console”.
5.6.3. Viewing basic virtual machine information in the RHEL 8 web console
The following describes how to view basic information about a selected virtual machine to which the web console session is connected.
Prerequisites
To be able to use the RHEL 8 web console to manage virtual machines, you must install the web console virtual machine plug-in.
If the web console plug-in is not installed, see Section 5.2, “Setting up the RHEL 8 web console to manage virtual machines” for information about installing the web console virtual machine plug-in.
Procedure
To view basic information about a selected virtual machine.
-
Click a row with the name of the virtual machine whose information you want to see.
The row expands to reveal the Overview pane with basic information about the selected virtual machine and controls for shutting down and deleting the virtual machine.
If another tab is selected, click .

The information includes the following:
- Memory - The amount of memory assigned to the virtual machine.
- Emulated Machine - The machine type emulated by the virtual machine.
vCPUs - The number of virtual CPUs configured for the virtual machine.
NoteTo see more detailed virtual CPU information and configure the virtual CPUs configured for a virtual machine, see Section 5.7, “Managing virtual CPUs using the RHEL 8 web console”.
- Boot Order - The boot order configured for the virtual machine.
- CPU Type - The architecture of the virtual CPUs configured for the virtual machine.
- Autostart - Whether or not autostart is enabled for the virtual machine.
Additional resources
- For information on viewing information about all of the virtual machines to which the web console session is connected, see Section 5.6.1, “Viewing a virtualization overview in the RHEL 8 web console”.
- For information on viewing information about the storage pools to which the web console session is connected, see Section 5.6.2, “Viewing storage pool information using the RHEL 8 web console”.
- For information on viewing resource usage for a selected virtual machine to which the web console session is connected, see Section 5.6.4, “Viewing virtual machine resource usage in the RHEL 8 web console”.
- For information on viewing disk information about a selected virtual machine to which the web console session is connected, see Section 5.6.5, “Viewing virtual machine disk information in the RHEL 8 web console”.
- For information on viewing virtual network interface card information about a selected virtual machine to which the web console session is connected, see Section 5.6.6, “Viewing virtual NIC information in the RHEL 8 web console”.
5.6.4. Viewing virtual machine resource usage in the RHEL 8 web console
The following describes how to view resource usage information about a selected virtual machine to which the web console session is connected.
Prerequisites
To be able to use the RHEL 8 web console to manage virtual machines, you must install the web console virtual machine plug-in.
If the web console plug-in is not installed, see Section 5.2, “Setting up the RHEL 8 web console to manage virtual machines” for information about installing the web console virtual machine plug-in.
Procedure
To view information about the memory and virtual CPU usage of a selected virtual machine.
-
Click a row with the name of the virtual machine whose information you want to see.
The row expands to reveal the Overview pane with basic information about the selected virtual machine and controls for shutting down and deleting the virtual machine. -
Click .
The Usage pane appears with information about the memory and virtual CPU usage of the virtual machine.

Additional resources
- For information on viewing information about all of the virtual machines to which the web console session is connected, see Section 5.6.1, “Viewing a virtualization overview in the RHEL 8 web console”.
- For information on viewing information about the storage pools to which the web console session is connected, see Section 5.6.2, “Viewing storage pool information using the RHEL 8 web console”.
- For information on viewing basic information about a selected virtual machine to which the web console session is connected, see Section 5.6.3, “Viewing basic virtual machine information in the RHEL 8 web console”.
- For information on viewing disk information about a selected virtual machine to which the web console session is connected, see Section 5.6.5, “Viewing virtual machine disk information in the RHEL 8 web console”.
- For information on viewing virtual network interface card information about a selected virtual machine to which the web console session is connected, see Section 5.6.6, “Viewing virtual NIC information in the RHEL 8 web console”.
5.6.5. Viewing virtual machine disk information in the RHEL 8 web console
The following describes how to view disk information about a virtual machine to which the web console session is connected.
Prerequisites
To be able to use the RHEL 8 web console to manage virtual machines, you must install the web console virtual machine plug-in.
If the web console plug-in is not installed, see Section 5.2, “Setting up the RHEL 8 web console to manage virtual machines” for information about installing the web console virtual machine plug-in.
Procedure
To view disk information about a selected virtual machine.
-
Click a row with the name of the virtual machine whose information you want to see.
The row expands to reveal the Overview pane with basic information about the selected virtual machine and controls for shutting down and deleting the virtual machine. -
Click .
The Disks pane appears with information about the disks assigned to the virtual machine.

The information includes the following:
- Device - The device type of the disk.
- Target - The controller type of the disk.
- Used - The amount of the disk that is used.
- Capacity - The size of the disk.
- Bus - The bus type of the disk.
- Readonly - Whether or not the disk is read-only.
- Source - The disk device or file.
Additional resources
- For information on viewing information about all of the virtual machines to which the web console session is connected, see Section 5.6.1, “Viewing a virtualization overview in the RHEL 8 web console”.
- For information on viewing information about the storage pools to which the web console session is connected, see Section 5.6.2, “Viewing storage pool information using the RHEL 8 web console”.
- For information on viewing basic information about a selected virtual machine to which the web console session is connected, see Section 5.6.3, “Viewing basic virtual machine information in the RHEL 8 web console”.
- For information on viewing resource usage for a selected virtual machine to which the web console session is connected, see Section 5.6.4, “Viewing virtual machine resource usage in the RHEL 8 web console”.
- For information on viewing virtual network interface card information about a selected virtual machine to which the web console session is connected, see Section 5.6.6, “Viewing virtual NIC information in the RHEL 8 web console”.
5.6.6. Viewing virtual NIC information in the RHEL 8 web console
The following describes how to view information about the virtual network interface cards (vNICs) on a selected virtual machine:
Prerequisites
To be able to use the RHEL 8 web console to manage virtual machines, you must install the web console virtual machine plug-in.
If the web console plug-in is not installed, see Section 5.2, “Setting up the RHEL 8 web console to manage virtual machines” for information about installing the web console virtual machine plug-in.
Procedure
To view information about the virtual network interface cards (NICs) on a selected virtual machine.
-
Click a row with the name of the virtual machine whose information you want to see.
The row expands to reveal the Overview pane with basic information about the selected virtual machine and controls for shutting down and deleting the virtual machine. Click .
The Networks pane appears with information about the virtual NICs configured for the virtual machine.
The information includes the following:
- Type - The type of network interface for the virtual machine. Types include direct, network, bridge, ethernet, hostdev, mcast, user, and server.
- Model type - The model of the virtual NIC.
- MAC Address - The MAC address of the virtual NIC.
- Source - The source of the network interface. This is dependent on the network type.
- State - The state of the virtual NIC.
To edit the virtual network settings, Click . The Virtual Network Interface Settings.

- Change the Network Type and Model.
Click . The network interface is modified.
NoteWhen the virtual machine is running, changes to the virtual network interface settings only take effect after the virtual machine is stopped and restarted.
Additional resources
- For information on viewing information about all of the virtual machines to which the web console session is connected, see Section 5.6.1, “Viewing a virtualization overview in the RHEL 8 web console”.
- For information on viewing information about the storage pools to which the web console session is connected, see Section 5.6.2, “Viewing storage pool information using the RHEL 8 web console”.
- For information on viewing basic information about a selected virtual machine to which the web console session is connected, see Section 5.6.3, “Viewing basic virtual machine information in the RHEL 8 web console”.
- For information on viewing resource usage for a selected virtual machine to which the web console session is connected, see Section 5.6.4, “Viewing virtual machine resource usage in the RHEL 8 web console”.
- For information on viewing disk information about a selected virtual machine to which the web console session is connected, see Section 5.6.5, “Viewing virtual machine disk information in the RHEL 8 web console”.
5.7. Managing virtual CPUs using the RHEL 8 web console
Using the RHEL 8 web console, you can manage the virtual CPUs configured for the virtual machines to which the web console is connected. You can view information about the virtual machines. You can also configure the virtual CPUs for virtual machines.
Prerequisites
To be able to use the RHEL 8 web console to manage virtual machines, you must install the web console virtual machine plug-in.
If the web console plug-in is not installed, see Section 5.2, “Setting up the RHEL 8 web console to manage virtual machines” for information about installing the web console virtual machine plug-in.
Procedure
-
Click a row with the name of the virtual machine for which you want to view and configure virtual CPU parameters.
The row expands to reveal the Overview pane with basic information about the selected virtual machine, including the number of virtual CPUs, and controls for shutting down and deleting the virtual machine. Click the number of vCPUs in the Overview pane.
The vCPU Details dialog appears. Note
NoteThe warning in the vCPU Details dialog only appears after the virtual CPU settings are changed.
Configure the virtual CPUs for the selected virtual machine.
vCPU Count - Enter the number of virtual CPUs for the virtual machine.
NoteThe vCPU count cannot be greater than the vCPU Maximum.
- vCPU Maximum - Enter the maximum number of virtual CPUs that can be configured for the virtual machine.
- Sockets - Select the number of sockets to expose to the virtual machine.
- Cores per socket - Select the number of cores for each socket to expose to the virtual machine.
- Threads per core - Select the number of threads for each core to expose to the virtual machine.
Click .
The virtual CPUs for the virtual machine are configured.
NoteWhen the virtual machine is running, changes to the virtual CPU settings only take effect after the virtual machine is stopped and restarted.
5.8. Managing virtual machine disks using the RHEL 8 web console
Using the RHEL 8 web console, you can manage the disks configured for the virtual machines to which the web console is connected.
You can:
5.8.1. Viewing virtual machine disk information in the RHEL 8 web console
The following describes how to view disk information about a virtual machine to which the web console session is connected.
Prerequisites
To be able to use the RHEL 8 web console to manage virtual machines, you must install the web console virtual machine plug-in.
If the web console plug-in is not installed, see Section 5.2, “Setting up the RHEL 8 web console to manage virtual machines” for information about installing the web console virtual machine plug-in.
Procedure
To view disk information about a selected virtual machine.
-
Click a row with the name of the virtual machine whose information you want to see.
The row expands to reveal the Overview pane with basic information about the selected virtual machine and controls for shutting down and deleting the virtual machine. -
Click .
The Disks pane appears with information about the disks assigned to the virtual machine.
The information includes the following:
- Device - The device type of the disk.
- Target - The controller type of the disk.
- Used - The amount of the disk that is used.
- Capacity - The size of the disk.
- Bus - The bus type of the disk.
- Readonly - Whether or not the disk is read-only.
- Source - The disk device or file.
Additional resources
- For information on viewing information about all of the virtual machines to which the web console session is connected, see Section 5.6.1, “Viewing a virtualization overview in the RHEL 8 web console”.
- For information on viewing information about the storage pools to which the web console session is connected, see Section 5.6.2, “Viewing storage pool information using the RHEL 8 web console”.
- For information on viewing basic information about a selected virtual machine to which the web console session is connected, see Section 5.6.3, “Viewing basic virtual machine information in the RHEL 8 web console”.
- For information on viewing resource usage for a selected virtual machine to which the web console session is connected, see Section 5.6.4, “Viewing virtual machine resource usage in the RHEL 8 web console”.
- For information on viewing virtual network interface card information about a selected virtual machine to which the web console session is connected, see Section 5.6.6, “Viewing virtual NIC information in the RHEL 8 web console”.
5.8.2. Adding new disks to virtual machines using the RHEL 8 web console
You can add new disks to virtual machines by creating a new disk (storage pool) and attaching it to a virtual machine using the RHEL 8 web console.
You can only use directory-type storage pools when creating new disks for virtual machines using the RHEL 8 web console.
Prerequisites
To be able to use the RHEL 8 web console to manage virtual machines, you must install the web console virtual machine plug-in.
If the web console plug-in is not installed, see Section 5.2, “Setting up the RHEL 8 web console to manage virtual machines” for information about installing the web console virtual machine plug-in.
Procedure
-
Click a row with the name of the virtual machine for which you want to create and attach a new disk.
The row expands to reveal the Overview pane with basic information about the selected virtual machine and controls for shutting down and deleting the virtual machine. Click .
The Disks pane appears with information about the disks configured for the virtual machine.
Click .
The Add Disk dialog appears.

- Ensure that the Create New option button is selected.
Configure the new disk.
- Pool - Select the storage pool from which the virtual disk will be created.
- Target - Select a target for the virtual disk that will be created.
- Name - Enter a name for the virtual disk that will be created.
- Size - Enter the size and select the unit (MiB or GiB) of the virtual disk that will be created.
- Format - Select the format for the virtual disk that will be created. Supported types: qcow2, raw
Persistence - Whether or not the virtual disk will be persistent. If checked, the virtual disk is persistent. If not checked, the virtual disk is not persistent.
NoteTransient disks can only be added to VMs that are running.
Click .
The virtual disk is created and connected to the virtual machine.
Additional resources
- For information on viewing disk information about a selected virtual machine to which the web console session is connected, see Section 5.8.1, “Viewing virtual machine disk information in the RHEL 8 web console”.
- For information on attaching existing disks to virtual machines, see Section 5.8.3, “Attaching existing disks to virtual machines using the RHEL 8 web console”.
- For information on detaching disks from virtual machines, see Section 5.8.4, “Detaching disks from virtual machines”.
5.8.3. Attaching existing disks to virtual machines using the RHEL 8 web console
The following describes how to attach existing disks to a virtual machine using the RHEL 8 web console.
You can only attach directory-type storage pools to virtual machines using the RHEL 8 web console.
Prerequisites
To be able to use the RHEL 8 web console to manage virtual machines, you must install the web console virtual machine plug-in.
If the web console plug-in is not installed, see Section 5.2, “Setting up the RHEL 8 web console to manage virtual machines” for information about installing the web console virtual machine plug-in.
Procedure
-
Click a row with the name of the virtual machine to which you want to attach an existing disk.
The row expands to reveal the Overview pane with basic information about the selected virtual machine and controls for shutting down and deleting the virtual machine. Click .
The Disks pane appears with information about the disks configured for the virtual machine.
-
Click .
The Add Disk dialog appears.
-
Click the Use Existing option button.
The appropriate configuration fields appear in the Add Disk dialog.
Configure the disk for the virtual machine.
- Pool - Select the storage pool from which the virtual disk will be attached.
- Target - Select a target for the virtual disk that will be attached.
- Volume - Select the storage volume that will be attached.
- Persistence - Check to make the virtual disk persistent. Clear to make the virtual disk transient.
Click
The selected virtual disk is attached to the virtual machine.
Additional resources
- For information on viewing disk information about a selected virtual machine to which the web console session is connected, see Section 5.8.1, “Viewing virtual machine disk information in the RHEL 8 web console”.
- For information on creating new disks and attaching them to virtual machines, see Section 5.8.2, “Adding new disks to virtual machines using the RHEL 8 web console”.
- For information on detaching disks from virtual machines, see Section 5.8.4, “Detaching disks from virtual machines”.
5.8.4. Detaching disks from virtual machines
The following describes how to detach disks from virtual machines using the RHEL 8 web console.
Prerequisites
To be able to use the RHEL 8 web console to manage virtual machines, you must install the web console virtual machine plug-in.
If the web console plug-in is not installed, see Section 5.2, “Setting up the RHEL 8 web console to manage virtual machines” for information about installing the web console virtual machine plug-in.
Procedure
-
Click a row with the name of the virtual machine from which you want to detach an existing disk.
The row expands to reveal the Overview pane with basic information about the selected virtual machine and controls for shutting down and deleting the virtual machine. Click .
The Disks pane appears with information about the disks configured for the virtual machine.
Click
 next to the disk you want to detach from the virtual machine.
The virtual disk is detached from the virtual machine.
There is no confirmation before detaching the disk from the virtual machine.
Additional resources
- For information on viewing disk information about a selected virtual machine to which the web console session is connected, see Section 5.8.1, “Viewing virtual machine disk information in the RHEL 8 web console”.
- For information on creating new disks and attaching them to virtual machines, see Section 5.8.2, “Adding new disks to virtual machines using the RHEL 8 web console”.
- For information on attaching existing disks to virtual machines, see Section 5.8.3, “Attaching existing disks to virtual machines using the RHEL 8 web console”.
5.9. Using the RHEL 8 web console for managing virtual machine vNICs
Using the RHEL 8 web console, you can manage the virtual network interface cards (vNICs) configured for the virtual machines to which the web console is connected. You can view information about vNICs. You can also connect and disconnect vNICs from virtual machines.
5.9.1. Viewing virtual NIC information in the RHEL 8 web console
The following describes how to view information about the virtual network interface cards (vNICs) on a selected virtual machine:
Prerequisites
To be able to use the RHEL 8 web console to manage virtual machines, you must install the web console virtual machine plug-in.
If the web console plug-in is not installed, see Section 5.2, “Setting up the RHEL 8 web console to manage virtual machines” for information about installing the web console virtual machine plug-in.
Procedure
To view information about the virtual network interface cards (NICs) on a selected virtual machine.
-
Click a row with the name of the virtual machine whose information you want to see.
The row expands to reveal the Overview pane with basic information about the selected virtual machine and controls for shutting down and deleting the virtual machine. Click .
The Networks pane appears with information about the virtual NICs configured for the virtual machine.The information includes the following:
- Type - The type of network interface for the virtual machine. Types include direct, network, bridge, ethernet, hostdev, mcast, user, and server.
- Model type - The model of the virtual NIC.
- MAC Address - The MAC address of the virtual NIC.
- Source - The source of the network interface. This is dependent on the network type.
- State - The state of the virtual NIC.
To edit the virtual network settings, Click . The Virtual Network Interface Settings.
- Change the Network Type and Model.
Click . The network interface is modified.
NoteWhen the virtual machine is running, changes to the virtual network interface settings only take effect after the virtual machine is stopped and restarted.
Additional resources
- For information on viewing information about all of the virtual machines to which the web console session is connected, see Section 5.6.1, “Viewing a virtualization overview in the RHEL 8 web console”.
- For information on viewing information about the storage pools to which the web console session is connected, see Section 5.6.2, “Viewing storage pool information using the RHEL 8 web console”.
- For information on viewing basic information about a selected virtual machine to which the web console session is connected, see Section 5.6.3, “Viewing basic virtual machine information in the RHEL 8 web console”.
- For information on viewing resource usage for a selected virtual machine to which the web console session is connected, see Section 5.6.4, “Viewing virtual machine resource usage in the RHEL 8 web console”.
- For information on viewing disk information about a selected virtual machine to which the web console session is connected, see Section 5.6.5, “Viewing virtual machine disk information in the RHEL 8 web console”.
5.9.2. Connecting virtual NICs in the RHEL 8 web console
Using the RHEL 8 web console, you can reconnect disconnected virtual network interface cards (NICs) configured for a selected virtual machine.
Prerequisites
To be able to use the RHEL 8 web console to manage virtual machines, you must install the web console virtual machine plug-in.
If the web console plug-in is not installed, see Section 5.2, “Setting up the RHEL 8 web console to manage virtual machines” for information about installing the web console virtual machine plug-in.
Procedure
-
Click a row with the name of the virtual machine whose virtual NIC you want to connect.
The row expands to reveal the Overview pane with basic information about the selected virtual machine and controls for shutting down and deleting the virtual machine. Click .
The Networks pane appears with information about the virtual NICs configured for the virtual machine.
-
Click in the row of the virtual NIC you want to connect.
The selected virtual NIC connects to the virtual machine.
5.9.3. Disconnecting virtual NICs in the RHEL 8 web console
Using the RHEL 8 web console, you can disconnect the virtual network interface cards (NICs) connected to a selected virtual machine.
Prerequisites
To be able to use the RHEL 8 web console to manage virtual machines, you must install the web console virtual machine plug-in.
If the web console plug-in is not installed, see Section 5.2, “Setting up the RHEL 8 web console to manage virtual machines” for information about installing the web console virtual machine plug-in.
Procedure
-
Click a row with the name of the virtual machine whose virtual NIC you want to disconnect.
The row expands to reveal the Overview pane with basic information about the selected virtual machine and controls for shutting down and deleting the virtual machine. Click .
The Networks pane appears with information about the virtual NICs configured for the virtual machine.
-
Click in the row of the virtual NIC you want to disconnect.
The selected virtual NIC disconnects from the virtual machine.
5.10. Interacting with virtual machines using the RHEL 8 web console
To interact with a VM in the RHEL 8 web console, you need to connect to the VM’s console. Using the RHEL 8 web console, you can view the virtual machine’s consoles. These include both graphical and serial consoles.
- To interact with the VM’s graphical interface in the RHEL 8 web console, use the graphical console in the RHEL 8 web console.
- To interact with the VM’s graphical interface in a remote viewer, use the graphical console in remote viewers.
- To interact with the VM’s CLI in the RHEL 8 web console, use the serial console in the RHEL 8 web console.
5.10.1. Viewing the virtual machine graphical console in the RHEL 8 web console
You can view the graphical console of a selected virtual machine in the RHEL 8 web console. The virtual machine console shows the graphical output of the virtual machine.
Prerequisites
To be able to use the RHEL 8 web console to manage virtual machines, you must install the web console virtual machine plug-in.
If the web console plug-in is not installed, see Section 5.2, “Setting up the RHEL 8 web console to manage virtual machines” for information about installing the web console virtual machine plug-in.
- Ensure that both the host and the VM support a graphical interface.
Procedure
-
Click a row with the name of the virtual machine whose graphical console you want to view.
The row expands to reveal the Overview pane with basic information about the selected virtual machine and controls for shutting down and deleting the virtual machine. -
Click .
The graphical console appears in the web interface.
You can interact with the virtual machine console using the mouse and keyboard in the same manner you interact with a real machine. The display in the virtual machine console reflects the activities being performed on the virtual machine.
The server on which the RHEL 8 web console is running can intercept specific key combinations, such as Ctrl+Alt+F1, preventing them from being sent to the virtual machine.
To send such key combinations, click the menu and select the key sequence to send.
For example, to send the Ctrl+Alt+F1 combination to the virtual machine, click the menu and select the menu entry.
Additional Resources
- For details on viewing the graphical console in a remote viewer, see Section 5.10.2, “Viewing virtual machine consoles in remote viewers using the RHEL 8 web console”.
- For details on viewing the serial console in the RHEL 8 web console, see Section 5.10.3, “Viewing the virtual machine serial console in the RHEL 8 web console”.
5.10.2. Viewing virtual machine consoles in remote viewers using the RHEL 8 web console
You can view the virtual machine’s consoles in a remote viewer. The connection can be made by the web console or manually.
5.10.2.1. Viewing the graphical console in a remote viewer
You can view the graphical console of a selected virtual machine in a remote viewer. The virtual machine console shows the graphical output of the virtual machine.
You can launch Virt Viewer from within the RHEL 8 web console. Other VNC and SPICE remote viewers can be launched manually.
Prerequisites
To be able to use the RHEL 8 web console to manage virtual machines, you must install the web console virtual machine plug-in.
If the web console plug-in is not installed, see Section 5.2, “Setting up the RHEL 8 web console to manage virtual machines” for information about installing the web console virtual machine plug-in.
- Ensure that both the host and the VM support a graphical interface.
Before you can view the graphical console in Virt Viewer, Virt Viewer must be installed on the machine to which the web console is connected.
To view information on installing Virt Viewer, select the Console Type and click More Information in the Consoles window.

Some browser extensions and plug-ins do not allow the web console to open Virt Viewer.
Procedure
-
Click a row with the name of the virtual machine whose graphical console you want to view.
The row expands to reveal the Overview pane with basic information about the selected virtual machine and controls for shutting down and deleting the virtual machine. -
Click .
The graphical console appears in the web interface. Select the Console Type.

Click .
The graphical console appears in Virt Viewer.
You can interact with the virtual machine console using the mouse and keyboard in the same manner you interact with a real machine. The display in the virtual machine console reflects the activities being performed on the virtual machine.
The server on which the RHEL 8 web console is running can intercept specific key combinations, such as Ctrl+Alt+F1, preventing them from being sent to the virtual machine.
To send such key combinations, click the menu and select the key sequence to send.
For example, to send the Ctrl+Alt+F1 combination to the virtual machine, click the menu and select the menu entry.
Additional Resources
- For details on viewing the graphical console in a remote viewer using a manual connection, see Section 5.10.2.2, “Viewing the graphical console in a remote viewer connecting manually”.
- For details on viewing the graphical console in the RHEL 8 web console, see Section 5.10.1, “Viewing the virtual machine graphical console in the RHEL 8 web console”.
- For details on viewing the serial console in the RHEL 8 web console, see Section 5.10.3, “Viewing the virtual machine serial console in the RHEL 8 web console”.
5.10.2.2. Viewing the graphical console in a remote viewer connecting manually
You can view the graphical console of a selected virtual machine in a remote viewer. The virtual machine console shows the graphical output of the virtual machine.
The web interface provides the information necessary to launch any SPICE or VNC viewer to view the virtual machine console. w
Prerequisites
To be able to use the RHEL 8 web console to manage virtual machines, you must install the web console virtual machine plug-in.
If the web console plug-in is not installed, see Section 5.2, “Setting up the RHEL 8 web console to manage virtual machines” for information about installing the web console virtual machine plug-in.
Before you can view the graphical console in a remote viewer, ensure that a SPICE or VNC viewer application is installed on the machine to which the web console is connected.
To view information on installing Virt Viewer, select the Console Type and click More Information in the Consoles window.
Procedure
You can view the virtual machine graphics console in any SPICE or VNC viewer application.
-
Click a row with the name of the virtual machine whose graphical console you want to view.
The row expands to reveal the Overview pane with basic information about the selected virtual machine and controls for shutting down and deleting the virtual machine. -
Click .
The graphical console appears in the web interface. Select the Console Type.
The following Manual Connection information appears on the right side of the pane.
- Enter the information in the SPICE or VNC viewer.
For more information, see the documentation for the SPICE or VNC viewer.
Additional Resources
- For details onviewing the graphical console in a remote viewer using the RHEL 8 web console to make the connection, see Section 5.10.2.1, “Viewing the graphical console in a remote viewer”.
- For details on viewing the graphical console in the RHEL 8 web console, see Section 5.10.1, “Viewing the virtual machine graphical console in the RHEL 8 web console”.
- For details on viewing the serial console in the RHEL 8 web console, see Section 5.10.3, “Viewing the virtual machine serial console in the RHEL 8 web console”.
5.10.3. Viewing the virtual machine serial console in the RHEL 8 web console
You can view the serial console of a selected virtual machine in the RHEL 8 web console. This is useful when the host machine or the VM is not configured with a graphical interface.
Prerequisites
To be able to use the RHEL 8 web console to manage virtual machines, you must install the web console virtual machine plug-in.
If the web console plug-in is not installed, see Section 5.2, “Setting up the RHEL 8 web console to manage virtual machines” for information about installing the web console virtual machine plug-in.
Procedure
-
Click a row with the name of the virtual machine whose serial console you want to view.
The row expands to reveal the Overview pane with basic information about the selected virtual machine and controls for shutting down and deleting the virtual machine. -
Click .
The graphical console appears in the web interface. Select the Console Type.
The serial console appears in the web interface.
You can disconnect and reconnect the serial console from the virtual machine.
- To disconnect the serial console from the virtual machine, click .
- To reconnect the serial console to the virtual machine, click .
Additional Resources
- For details on viewing the graphical console in the RHEL 8 web console, see Section 5.10.1, “Viewing the virtual machine graphical console in the RHEL 8 web console”.
- For details on viewing the graphical console in a remote viewer, see Section 5.10.2, “Viewing virtual machine consoles in remote viewers using the RHEL 8 web console”.
5.11. Creating storage pools using the RHEL 8 web console
You can create storage pools using the RHEL 8 web console.
Prerequisites
To be able to use the RHEL 8 web console to manage virtual machines, you must install the web console virtual machine plug-in.
If the web console plug-in is not installed, see Section 5.2, “Setting up the RHEL 8 web console to manage virtual machines” for information about installing the web console virtual machine plug-in.
Procedure
Click at the top of the Virtual Machines tab. The Storage Pools window appears showing a list of configured storage pools.
Click . The Create Storage Pool dialog appears.

Enter the following information in the Create Storage Pool dialog:
- Connection - The connection to the host to be used by the storage pool.
- Name - The name of the storage pool.
- Type - The type of the storage pool: Filesystem Directory, Network File System
- Target Path - The storage pool path on the host’s file system.
- Startup - Whether or not the storage pool starts when the host boots.
- Click . The storage pool is created, the Create Storage Pool dialog closes, and the new storage pool appears in the list of storage pools.
Related information
- For information on viewing information about storage pools using the RHEL 8 web console, see Section 5.6.2, “Viewing storage pool information using the RHEL 8 web console”.
Chapter 6. Managing virtual devices
One of the most effective ways to manage the functionality, features, and performance of a virtual machine (VM) is to adjust its virtual devices.
The following sections provide a general overview of what virtual devices are, and instructions how they can be attached, modified, or removed from a VM.
6.1. How virtual devices work
The basics
Just like physical machines, virtual machines (VMs) require specialized devices to provide functions to the system, such as processing power, memory, storage, networking, or graphics. Physical systems usually use hardware devices for these purposes. However, because VMs work as software implements, they need to use software abstractions of such devices instead, referred to as virtual devices.
Virtual devices attached to a VM can be configured when creating the VM, but can also be managed on an existing VM. Generally, the virtual devices attached to a VM can only be configured when the VM is shut off, but some can be added or removed when the VM is running. This feature is also referred to as device hot plug and hot unplug.
When creating a new VM, libvirt automatically creates and configures a default set of essential virtual devices, unless specified otherwise by the user. These are based on the host system architecture and machine type, and usually include:
- the CPU
- memory
- a keyboard
- a network interface controller (NIC)
- various device controllers
- a video card
- a sound card
To manage virtual devices after the VM is created, use the command-line interface (CLI). However, to manage virtual storage devices and NICs, you can also use the RHEL 8 web console.
Performance or flexibility
For some types of devices, RHEL 8 supports multiple implementations, often with a trade-off between performance and flexibility.
For example, the physical storage used for virtual disks can be represented by files in various formats, such as qcow2 or raw, and presented to the virtual machine using a variety of controllers: emulated controller, virtio-scsi, or virtio-blk.
An emulated controller is slower than a virtio controller because virtio devices are designed specifically for virtualization purposes. On the other hand, emulated controllers make it possible to run operating systems that have no drivers for virtio devices. Similarly, virtio-scsi offers a more complete support for SCSI commands, and makes it possible to attach a larger number of disks to the virtual machine. Finally, virtio-blk provides better performance than both virtio-scsi and emulated controllers, but a more limited range of use-cases.
For more information on types of virtual devices, see Section 6.5, “Types of virtual devices”.
Additional resources
- For instructions how to attach, remove, or modify VM storage devices using the CLI, see Chapter 7, Managing storage for virtual machines.
- For instructions how to manage VM disks using the RHEL 8 web console, see Section 5.8, “Managing virtual machine disks using the RHEL 8 web console”.
- For instructions how to manage VM NICs using the RHEL 8 web console, see Section 5.9, “Using the RHEL 8 web console for managing virtual machine vNICs”.
- For instructions how to create and manage NVIDIA vGPUs, see Chapter 8, Managing NVIDIA vGPU devices.
6.2. Attaching devices to virtual machines
The following provides general information for creating and attaching virtual devices to your virtual machines (VMs) using the command-line interface (CLI). Some devices can also be attached to VMs using the RHEL 8 web console.
Prerequisites
Obtain the required options for the device you intend to attach to a VM. To see the available option for a specific device, use the
virt-xml --device=?command. For example:# virt-xml --network=? --network options: [...] address.unit boot_order clearxml driver_name [...]
Procedure
To attach a device to a VM, use the
virt-xml --add-devicecommand, including the definition of the device and the required options:For example, the following creates a 20GB newdisk qcow2 disk image in the
/var/lib/libvirt/images/directory, and attaches it as a virtual disk to the running testguest VM on the next start-up of the VM:# virt-xml testguest --add-device --disk /var/lib/libvirt/images/newdisk.qcow2,format=qcow2,size=20 Domain 'testguest' defined successfully. Changes will take effect after the domain is fully powered off.The following attaches a USB flash drive, attached as device 004 on bus 002 on the host, to the testguest2 VM while the VM is running:
# virt-xml testguest2 --add-device --update --hostdev 002.004 Device hotplug successful. Domain 'testguest2' defined successfully.The bus-device combination for defining the USB can be obtained using the
lsusbcommand.
[Optional] Verify the device has been added by doing any of the following:
-
Use the
virsh dumpxmlcommand and see if the device’s XML definition has been added to the<devices>section in the VM’s XML configuration. Run the VM and test if the device is present and works properly.
For example, the following displays the configuration of the testguest VM and confirms that the 002.004 USB flash disk device has been added.
# virsh dumpxml testguest [...] <hostdev mode='subsystem' type='usb' managed='yes'> <source> <vendor id='0x4146'/> <product id='0x902e'/> <address bus='2' device='4'/> </source> <alias name='hostdev0'/> <address type='usb' bus='0' port='3'/> </hostdev> [...]
-
Use the
Additional resources
-
For further information on using the
virt-xmlcommand, useman virt-xml.
6.3. Modifying devices attached to virtual machines
The following provides general information for modifying virtual devices using the command-line interface (CLI). Some devices attached to your VM, such as disks and NICs, can also be modified using the RHEL 8 web console.
Prerequisites
-
Obtain the required options for the device you intend to attach to a VM. To see the available option for a specific device, use the
virt-xml --device=?command. For example:
# virt-xml --network=?
--network options:
[...]
address.unit
boot_order
clearxml
driver_name
[...]-
[Optional] Back up the XML configuration of your VM by using
virsh dumpxml vm-nameand sending the output to a file. For example, the following backs up the configuration of your Motoko VM as themotoko.xmlfile:
# virsh dumpxml Motoko > motoko.xml
# cat motoko.xml
<domain type='kvm' xmlns:qemu='http://libvirt.org/schemas/domain/qemu/1.0'>
  <name>Motoko</name>
  <uuid>ede29304-fe0c-4ca4-abcd-d246481acd18</uuid>
  [...]
</domain>
Procedure
Use the
virt-xml --editcommand, including the definition of the device and the required options:For example, the following clears the <cpu> configuration of the shut-off testguest VM and sets it to host-model:
# virt-xml testguest --edit --cpu host-model,clearxml=yes
Domain 'testguest' defined successfully.
[Optional] Verify the device has been modified by doing any of the following:
- Run the VM and test if the device is present and reflects the modifications.
Use the
virsh dumpxmlcommand and see if the device’s XML definition has been modified in the VM’s XML configuration.For example, the following displays the configuration of the testguest VM and confirms that the CPU mode has been configured as host-model.
# virsh dumpxml testguest
[...]
<cpu mode='host-model' check='partial'>
  <model fallback='allow'/>
</cpu>
[...]
[Optional] If modifying a device causes your VM to become unbootable, use the
virsh defineutility to restore the XML configuration by reloading the XML configuration file you backed up previously.# virsh define testguest.xml
For small changes directly in the XML configuration of your VM, you can use the virsh edit command - for example virsh edit testguest. However, do not use this method for more extensive changes, as it is more likely to break the configuration in ways that would prevent the VM from booting.
Additional resources
-
For details on using the
virt-xmlcommand, useman virt-xml.
6.4. Removing devices from virtual machines
The following provides general information for removing virtual devices from your virtual machines (VMs) using the command-line interface (CLI). Some devices, such as disks or NICs, can also be removed from VMs using the RHEL 8 web console.
Prerequisites
-
[Optional] Back up the XML configuration of your VM by using
virsh dumpxml vm-nameand sending the output to a file. For example, the following backs up the configuration of your Motoko VM as themotoko.xmlfile:
# virsh dumpxml Motoko > motoko.xml
# cat motoko.xml
<domain type='kvm' xmlns:qemu='http://libvirt.org/schemas/domain/qemu/1.0'>
  <name>Motoko</name>
  <uuid>ede29304-fe0c-4ca4-abcd-d246481acd18</uuid>
  [...]
</domain>
Procedure
Use the
virt-xml --remove-devicecommand, including a definition of the device. For example:The following removes the storage device marked as vdb from the running testguest VM after it shuts down:
# virt-xml testguest --remove-device --disk target=vdb
Domain 'testguest' defined successfully.
Changes will take effect after the domain is fully powered off.
The following immediately removes an USB flash drive device from the running testguest2 VM:
# virt-xml testguest2 --remove-device --update --hostdev type=usb
Device hotunplug successful.
Domain '7.4-workstation' defined successfully.
[Optional] If removing a device causes your VM to become unbootable, use the
virsh defineutility to restore the XML configuration by reloading the XML configuration file you backed up previously.# virsh define testguest.xml
Additional resources
-
For details on using the
virt-xmlcommand, useman virt-xml.
6.5. Types of virtual devices
Virtualization in RHEL 8 can present three distinct types of virtual devices to virtual machines (VMs):
- Emulated devices
Emulated devices are software implementations of widely used physical devices. Standard device drivers designed to interact with physical devices will work identically with emulated devices. Therefore, emulated devices do not need specific drivers. As such, emulated devices can be used very flexibly.
However, since they need to faithfully emulate a particular type of hardware, emulated devices may suffer a significant performance loss in comparison to the corresponding physical devices or to more optimized virtual devices.
The following types of emulated devices are supported:
- Virtual CPUs (vCPUs), with a large choice of CPU models being available. The performance impact of emulation depends significantly on the differences between the host CPU and the emulated vCPU.
- Emulated system components, such as PCI bus controllers
- Emulated storage controllers, such as SATA, SCSI or even IDE
- Emulated sound devices, such as ICH9, ICH6 or AC97
- Emulated graphics cards, such as VGA or QXL cards
- Emulated network devices, such as rtl8139
- Paravirtualized devices
Paravirtualization provides a fast and efficient method for exposing virtual devices to VMs. Paravirtualized devices expose interfaces that are designed specifically for use in virtual machines, and thus significantly increase the device performance. RHEL 8 provides paravirtualized devices to virtual machines using the virtio API as a layer between the hypervisor and the VM. The drawback of this approach is that it requires a specific device driver in the guest operating system.
Whenever possible, it is recommended to use paravirtualized devices instead of emulated devices for VM, notably if they are running I/O intensive applications. Paravirtualized devices decrease I/O latency and increase I/O throughput, in some cases bringing them very close to bare-metal performance. Other paravirtualized devices also add functionality to virtual machines that is not otherwise available.
The following types of paravirtualized devices are supported:
-
The paravirtualized network device (
virtio-net) Paravirtualized storage controllers:
-
virtio-blk- provides block device emulation -
virtio-scsi- provides more complete SCSI emulation
-
- The paravirtualized clock
-
The paravirtualized serial device (
virtio-serial) -
The balloon device (
virtio-balloon), used to share information about guest memory usage with the hypervisor -
The paravirtualized random number generator (
virtio-rng) -
The paravirtualized graphics card (
QXL)
-
The paravirtualized network device (
- Physically shared devices
Certain hardware platforms enable virtual machines to directly access various hardware devices and components. This process is known as device assignment, or also as passthrough.
When attached in this way, some aspects of the physical device are directly available to the VM as they would be to a physical machine. This provides superior performance for the device when used in the VM. However, devices physically attached to a VM become unavailable to the host, and also cannot be migrated.
Nevertheless, some devices can be shared across multiple VMs. For example, a single physical device can in certain cases provide multiple mediated devices, which can then be assigned to distinct VMs.
The following types of passthrough devices are supported:
- Virtual Function I/O (VFIO) device assignment - safely exposes devices to applications or virtual machines using hardware-enforced DMA and interrupt isolation.
- USB, PCI, and SCSI passthrough - expose common industry standard buses directly to VMs in order to make their specific features available to guest software.
- Single-root I/O virtualization (SR-IOV) - a specification that enables hardware-enforced isolation of PCI Express resources. This makes it safe and efficient to partition a single physical PCI resource into virtual PCI functions. It is commonly used for network interface cards (NICs).
- N_Port ID virtualization (NPIV) - a Fibre Channel technology to share a single physical host bus adapter (HBA) with multiple virtual ports.
- GPUs and vGPUs - accelerators for specific kinds of graphic or compute workloads. Some GPUs can be attached directly to a guest, while certain types also offer the ability to create virtual GPUs (vGPUs) that share the underlying physical hardware.
Chapter 7. Managing storage for virtual machines
You can manage virtual machine storage using the CLI or the web console.
This documentation provides information on how to manage virtual machine storage using the virsh command.
7.1. Understanding virtual machine storage
The following sections provide information about storage for virtual machines (VMs), including information about storage pools, storage volumes, and how they are used to provide storage for VMs.
7.1.1. Virtual machine storage
The following provides information about how storage pools and storage volumes are used to create storage for VMs.
A storage pool is a quantity of storage managed by the host set aside for use by VMs. Storage volumes can be created from space in the storage pools. Each storage volume can be assigned to a VM as a block device on a guest bus.
Storage pools and volumes are managed using libvirt. With the libvirt remote protocol, you can manage all aspects of virtual machine storage. These operations can be performed on a remote host. As a result, a management application, such as the RHEL web console, using libvirt can enable a user to perform all the required tasks for configuring virtual machine storage.
The libvirt API can be used to query the list of volumes in the storage pool or to get information regarding the capacity, allocation, and available storage in the storage pool. A storage volume in the storage pool may be queried to get information such as allocation and capacity, which may differ for sparse volumes.
For storage pools that support it, the libvirt API can be used to create, clone, resize, and delete storage volumes. The APIs can also be used to upload data to storage volumes, download data from storage volumes, or wipe data from storage volumes.
Once a storage pool is started, a storage volume can be assigned to a guest using the storage pool name and storage volume name instead of the host path to the volume in the XML configuration files of the virtual machine.
7.1.2. Storage pools
A storage pool is a file, directory, or storage device, managed by libvirt to provide storage to virtual machines. Storage pools are divided into storage volumes that store virtual machine images or are attached to VMs as additional storage. Multiple guests can share the same storage pool, allowing for better allocation of storage resources.
Storage pools can be persistent or transient:
- A persistent storage pool survives a system restart of the host machine.
- A transient storage pool only exists until the host reboots.
The virsh pool-define command is used to create a persistent storage pool, and the virsh pool-create command is used to create a transient storage pool.
Storage pool storage types
Storage pools can be either local or network-based (shared):
Local storage pools
Local storage pools are attached directly to the host server. They include local directories, directly attached disks, physical partitions, and Logical Volume Management (LVM) volume groups on local devices.
Local storage pools are useful for development, testing, and small deployments that do not require migration or large numbers of VMs.
Networked (shared) storage pools
Networked storage pools include storage devices shared over a network using standard protocols.
Storage pool actions
Storage pools can be stopped (destroyed). This removes the abstraction of the data, but keeps the data intact.
For example, an NFS server that uses mount -t nfs nfs.example.com:/path/to/share /path/to/data. A storage administrator responsible could define an NFS Storage Pool on the virtualization host to describe the exported server path and the client target path. This will allow libvirt to perform the mount either automatically when libvirt is started or as needed while libvirt is running. Files with the NFS Server exported directory are listed as storage volumes within the NFS storage pool.
When the storage volume is added to the VM, the administrator does not need to add the target path to the volume. He just needs to add the storage pool and storage volume by name. Therefore, if the target client path changes, it does not affect the virtual machine.
When the storage pool is started, libvirt mounts the share on the specified directory, just as if the system administrator logged in and executed mount nfs.example.com:/path/to/share /vmdata. If the storage pool is configured to autostart, libvirt ensures that the NFS shared disk is mounted on the directory specified when libvirt is started.
Once the storage pool is started, the files in the NFS shared disk are reported as storage volumes, and the storage volumes' paths may be queried using the libvirt API. The storage volumes' paths can then be copied into the section of a virtual machine’s XML definition that describes the source storage for the virtual machine’s block devices. In the case of NFS, an application that uses the libvirt API can create and delete storage volumes in the storage pool (files in the NFS share) up to the limit of the size of the pool (the storage capacity of the share).
Not all storage pool types support creating and deleting volumes. Stopping the storage pool (pool-destroy) undoes the start operation, in this case, unmounting the NFS share. The data on the share is not modified by the destroy operation, despite what the name of the command suggests. For more details, see man virsh.
Supported and unsupported storage pool types
The following is a list of storage pool types supported by RHEL:
- Directory-based storage pools
- Disk-based storage pools
- Partition-based storage pools
- GlusterFS storage pools
- iSCSI-based storage pools
- LVM-based storage pools
- NFS-based storage pools
- vHBA-based storage pools with SCSI devices
- Multipath-based storage pools
- RBD-based storage pools
The following is a list of libvirt storage pool types that are not supported by RHEL:
- Sheepdog-based storage pools
- Vstorage-based storage pools
- ZFS-based storage pools
7.1.3. Storage volumes
Storage pools are divided into storage volumes. Storage volumes are abstractions of physical partitions, LVM logical volumes, file-based disk images, and other storage types handled by libvirt. Storage volumes are presented to VMs as local storage devices regardless of the underlying hardware.
On the host machine, a storage volume is referred to by its name and an identifier for the storage pool from which it derives. On the virsh command line, this takes the form --pool storage_pool volume_name.
For example, a volume named firstimage in the guest_images pool.
# virsh vol-info --pool guest_images firstimage
  Name:             firstimage
  Type:             block
  Capacity:         20.00 GB
  Allocation:       20.00 GB
7.2. Managing storage for virtual machines using the CLI
This documentation provides information on how to manage virtual machine storage using the virsh command.
You can add, remove, and modify virtual machine storage using the CLI. You can also view information about virtual machine storage.
In many cases, storage for a VM is created at the same time the VM is created. Therefore, the following information primarily relates to advanced management of VM storage.
7.2.1. Viewing virtual machine storage information using the CLI
The following provides information about viewing information about storage pools and storage volumes using the CLI.
7.2.1.1. Viewing storage pool information using the CLI
The following provides information on viewing information about storage pools. You can view a list of all storage pools with limited or full details about the storage pools. You can also filter the storage pools listed.
Procedure
Use the
virsh pool-listcommand to view storage pool information.# virsh pool-list --all --details Name State Autostart Persistent Capacity Allocation Available ---------------------------------------------------------------------------------------- default running yes yes 48.97 GiB 23.93 GiB 25.03 GiB Downloads running yes yes 175.62 GiB 62.02 GiB 113.60 GiB RHEL8-Storage-Pool running yes yes 214.62 GiB 93.02 GiB 168.60 GiB
Additional resources
-
For information on the available
virsh pool-listoptions, see the relevantmanpages.
7.2.1.2. Viewing storage volume information using the CLI
The following provides information on viewing information about storage pools. You can view a list of all storage pools in a specified storage pool and details about a specified storage pool.
Procedure
Use the
virsh vol-listcommand to list the storage volumes in a specified storage pool.# virsh vol-list --pool RHEL8-Storage-Pool --details Name Path Type Capacity Allocation --------------------------------------------------------------------------------------------- .bash_history /home/VirtualMachines/.bash_history file 18.70 KiB 20.00 KiB .bash_logout /home/VirtualMachines/.bash_logout file 18.00 B 4.00 KiB .bash_profile /home/VirtualMachines/.bash_profile file 193.00 B 4.00 KiB .bashrc /home/VirtualMachines/.bashrc file 1.29 KiB 4.00 KiB .git-prompt.sh /home/VirtualMachines/.git-prompt.sh file 15.84 KiB 16.00 KiB .gitconfig /home/VirtualMachines/.gitconfig file 167.00 B 4.00 KiB RHEL8_Volume.qcow2 /home/VirtualMachines/RHEL8_Volume.qcow2 file 60.00 GiB 13.93 GiBNoteFor information on the available
virsh vol-listoptions, see the relevantmanpages.Use the
virsh vol-infocommand to list the storage volumes in a specified storage pool.# vol-info --pool RHEL8-Storage-Pool --vol RHEL8_Volume.qcow2 Name: RHEL8_Volume.qcow2 Type: file Capacity: 60.00 GiB Allocation: 13.93 GiBNoteFor information on the available
virsh vol-infooptions, see the relevantmanpages.
7.2.2. Creating and assigning storage for virtual machines using the CLI
The following is a high-level procedure for creating and assigning storage for virtual machines:
Create storage pools
Create one or more storage pools from available storage media. For a list of supported storage pool types, see Storage pool types.
To create persistent storage pools, use the
virsh pool-defineandvirsh pool-define-ascommands.The
virsh pool-definecommand uses an XML file for the pool options. Thevirsh pool-define-ascommand places the options in the command line.To create temporary storage pools, use the
virsh pool-createandvirsh pool-create-ascommands.The
virsh pool-createcommand uses an XML file for the pool options. Thevirsh pool-create-ascommand places the options in the command line.
All examples and procedures in this documentation are for creating persistent storage pools using the virsh pool-define command. For more information on the virsh pool-create, virsh pool-define-as, and virsh pool-create-as commands, see the relevant man pages.
Create storage volumes
Create one or more storage volumes from the available storage pools.
NoteAll examples and procedures in this documentation are for creating storage using the
virsh vol‑createcommand. For more information on thevirsh vol-create-ascommand, see the relevant man pages.Assign storage devices to a virtual machine
Assign one or more storage devices abstracted from storage volumes to a guest virtual machine.
The following sections provide information on creating and assigning storage using the CLI:
7.2.2.1. Creating and assigning directory-based storage for virtual machines using the CLI
The following provides information about creating directory-based storage pools and storage volumes and assigning volumes to virtual machines.
7.2.2.1.1. Creating directory-based storage pools using the CLI
The following provides instructions for creating directory-based storage pools.
Procedure
Define the storage pool in an XML file
Create a temporary XML file containing the storage pool parameters required for the new device.
NoteFor information on the required parameters, refer to Parameters.
Create a storage pool
Use the
virsh pool-definecommand to create a persistent storage pool based on the XML file created in the previous step.# virsh pool-define ~/guest_images.xml Pool defined from guest_images_fs
You can delete the XML file created in step 1 after running the virsh pool-define command.
Define the storage pool target path
Use the
virsh pool-buildcommand to create a storage pool target path for a pre-formatted file system storage pool, initialize the storage source device, and define the format of the data.# virsh pool-build guest_images_fs Pool guest_images_fs built # ls -la /guest_images total 8 drwx------. 2 root root 4096 May 31 19:38 . dr-xr-xr-x. 25 root root 4096 May 31 19:38 ..
Verify that the pool was created
Use the
virsh pool-listcommand to verify that the pool was created.# virsh pool-list --all Name State Autostart ----------------------------------------- default active yes guest_images_fs inactive noStart the storage pool
Use the
virsh pool-startcommand to mount the storage pool.# virsh pool-start guest_images_fs Pool guest_images_fs startedNoteThe
virsh pool-startcommand is only necessary for persistent storage pools. Transient storage pools are automatically started when they are created.[Optional] Turn on autostart
By default, a storage pool defined with the
virshcommand is not set to automatically start each time libvirtd starts. Use thevirsh pool-autostartcommand to configure the storage pool to autostart.# virsh pool-autostart guest_images_fs Pool guest_images_fs marked as autostartedVerify the
AutostartstateUse the
virsh pool-listcommand to verify theAutostartstate.# virsh pool-list --all Name State Autostart ----------------------------------------- default active yes guest_images_fs inactive yesVerify the storage pool
Verify that the storage pool was created correctly, the sizes reported are as expected, and the state is reported as
running. Verify there is alost+founddirectory in the target path on the file system, indicating that the device is mounted.# virsh pool-info guest_images_fs Name: guest_images_fs UUID: c7466869-e82a-a66c-2187-dc9d6f0877d0 State: running Persistent: yes Autostart: yes Capacity: 458.39 GB Allocation: 197.91 MB Available: 458.20 GB # mount | grep /guest_images /dev/sdc1 on /guest_images type ext4 (rw) # ls -la /guest_images total 24 drwxr-xr-x. 3 root root 4096 May 31 19:47 . dr-xr-xr-x. 25 root root 4096 May 31 19:38 .. drwx------. 2 root root 16384 May 31 14:18 lost+found
7.2.2.1.2. Directory-based storage pool parameters
The following provides information about the required parameters for a directory-based storage pool and an example.
Parameters
The following table provides a list of required parameters for the XML file for a directory-based storage pool.
Table 7.1. Directory-based storage pool parameters
| Description | XML |
|---|---|
| The type of storage pool |
|
| The name of the storage pool |
|
| The path specifying the target. This will be the path used for the storage pool. |
|
Example
The following is an example of an XML file for a storage pool based on the /guest_images directory:
<pool type='dir'>
  <name>dirpool</name>
  <target>
    <path>/guest_images</path>
  </target>
</pool>
7.2.2.2. Creating and assigning disk-based storage for virtual machines using the CLI
The following provides information about creating disk-based storage pools and storage volumes and assigning volumes to virtual machines.
7.2.2.2.1. Creating disk-based storage pools using the CLI
The following provides instructions for creating disk-based storage pools.
Recommendations
Be aware of the following before creating a disk-based storage pool:
-
Depending on the version of
libvirtbeing used, dedicating a disk to a storage pool may reformat and erase all data currently stored on the disk device. It is strongly recommended that you back up the data on the storage device before creating a storage pool. Guests should not be given write access to whole disks or block devices (for example,
/dev/sdb). Use partitions (for example,/dev/sdb1) or LVM volumes.If you pass an entire block device to the guest, the guest will likely partition it or create its own LVM groups on it. This can cause the host machine to detect these partitions or LVM groups and cause errors.
Procedure
Relabeled the disk with a GUID Partition Table (GPT) disk label. GPT disk labels allow for creating up to 128 partitions on each device.
# parted /dev/sdb
GNU Parted 2.1
Using /dev/sdb
Welcome to GNU Parted! Type 'help' to view a list of commands.
(parted) mklabel
New disk label type? gpt
(parted) quit
Information: You may need to update /etc/fstab.
#
Define the storage pool in an XML file
Create a temporary XML file containing the storage pool parameters required for the new device.
NoteFor information on the required parameters, refer to Parameters.
Create a storage pool
Use the
virsh pool-definecommand to create a persistent storage pool based on the XML file created in the previous step.# virsh pool-define ~/guest_images.xml Pool defined from guest_images_fs
You can delete the XML file created in step 1 after running the virsh pool-define command.
Define the storage pool target path
Use the
virsh pool-buildcommand to create a storage pool target path for a pre-formatted file-system storage pool, initialize the storage source device, and define the format of the data.# virsh pool-build guest_images_fs Pool guest_images_fs built # ls -la /guest_images total 8 drwx------. 2 root root 4096 May 31 19:38 . dr-xr-xr-x. 25 root root 4096 May 31 19:38 ..
NoteBuilding the target path is only necessary for disk-based, file system-based, and logical storage pools. If
libvirtdetects that the source storage device’s data format differs from the selected storage pool type, the build fails, unless theoverwriteoption is specified.Verify that the pool was created
Use the
virsh pool-listcommand to verify that the pool was created.# virsh pool-list --all Name State Autostart ----------------------------------------- default active yes guest_images_fs inactive noStart the storage pool
Use the
virsh pool-startcommand to mount the storage pool.# virsh pool-start guest_images_fs Pool guest_images_fs startedNoteThe
virsh pool-startcommand is only necessary for persistent storage pools. Transient storage pools are automatically started when they are created.[Optional] Turn on autostart
By default, a storage pool defined with the
virshcommand is not set to automatically start each time libvirtd starts. Use thevirsh pool-autostartcommand to configure the storage pool to autostart.# virsh pool-autostart guest_images_fs Pool guest_images_fs marked as autostartedVerify the
AutostartstateUse the
virsh pool-listcommand to verify theAutostartstate.# virsh pool-list --all Name State Autostart ----------------------------------------- default active yes guest_images_fs inactive yesVerify the storage pool
Verify that the storage pool was created correctly, the sizes reported are as expected, and the state is reported as
running. Verify there is alost+founddirectory in the target path on the file system, indicating that the device is mounted.# virsh pool-info guest_images_fs Name: guest_images_fs UUID: c7466869-e82a-a66c-2187-dc9d6f0877d0 State: running Persistent: yes Autostart: yes Capacity: 458.39 GB Allocation: 197.91 MB Available: 458.20 GB # mount | grep /guest_images /dev/sdc1 on /guest_images type ext4 (rw) # ls -la /guest_images total 24 drwxr-xr-x. 3 root root 4096 May 31 19:47 . dr-xr-xr-x. 25 root root 4096 May 31 19:38 .. drwx------. 2 root root 16384 May 31 14:18 lost+found
7.2.2.2.2. Disk-based storage pool parameters
The following provides information about the required parameters for a directory-based storage pool and an example.
Parameters
The following table provides a list of required parameters for the XML file for a disk-based storage pool.
Table 7.2. Disk-based storage pool parameters
| Description | XML |
|---|---|
| The type of storage pool |
|
| The name of the storage pool |
|
|
The path specifying the storage device. For example, |
|
| The path specifying the target device. This will be the path used for the storage pool. |
|
Example
The following is an example of an XML file for a disk-based storage pool:
<pool type='disk'>
  <name>phy_disk</name>
  <source>
    <device path='/dev/sdb'/>
    <format type='gpt'/>
  </source>
  <target>
    <path>/dev</path>
  </target>
</pool>
7.2.2.3. Creating and assigning filesystem-based storage for virtual machines using the CLI
The following provides information about creating directory-based storage pools and storage volumes and assigning volumes to virtual machines.
7.2.2.3.1. Creating filesystem-based storage pools using the CLI
The following provides instructions for creating filesystem-based storage pools.
Recommendations
Do not use this procedure to assign an entire disk as a storage pool (for example, /dev/sdb). Guests should not be given write access to whole disks or block devices. This method should only be used to assign partitions (for example, /dev/sdb1) to storage pools.
Procedure
Define the storage pool in an XML file
Create a temporary XML file containing the storage pool parameters required for the new device.
NoteFor information on the required parameters, refer to Parameters.
Create a storage pool
Use the
virsh pool-definecommand to create a persistent storage pool based on the XML file created in the previous step.# virsh pool-define ~/guest_images.xml Pool defined from guest_images_fs
You can delete the XML file created in step 1 after running the virsh pool-define command.
Define the storage pool target path
Use the
virsh pool-buildcommand to create a storage pool target path for a pre-formatted filesystem storage pool, initialize the storage source device, and define the format of the data.# virsh pool-build guest_images_fs Pool guest_images_fs built # ls -la /guest_images total 8 drwx------. 2 root root 4096 May 31 19:38 . dr-xr-xr-x. 25 root root 4096 May 31 19:38 ..
Verify that the pool was created
Use the
virsh pool-listcommand to verify that the pool was created.# virsh pool-list --all Name State Autostart ----------------------------------------- default active yes guest_images_fs inactive noStart the storage pool
Use the
virsh pool-startcommand to mount the storage pool.# virsh pool-start guest_images_fs Pool guest_images_fs startedNoteThe
virsh pool-startcommand is only necessary for persistent storage pools. Transient storage pools are automatically started when they are created.[Optional] Turn on autostart
By default, a storage pool defined with the
virshcommand is not set to automatically start each time libvirtd starts. Use thevirsh pool-autostartcommand to configure the storage pool to autostart.# virsh pool-autostart guest_images_fs Pool guest_images_fs marked as autostartedVerify the
AutostartstateUse the
virsh pool-listcommand to verify theAutostartstate.# virsh pool-list --all Name State Autostart ----------------------------------------- default active yes guest_images_fs inactive yesVerify the storage pool
Verify that the storage pool was created correctly, the sizes reported are as expected, and the state is reported as
running. Verify there is alost+founddirectory in the target path on the file system, indicating that the device is mounted.# virsh pool-info guest_images_fs Name: guest_images_fs UUID: c7466869-e82a-a66c-2187-dc9d6f0877d0 State: running Persistent: yes Autostart: yes Capacity: 458.39 GB Allocation: 197.91 MB Available: 458.20 GB # mount | grep /guest_images /dev/sdc1 on /guest_images type ext4 (rw) # ls -la /guest_images total 24 drwxr-xr-x. 3 root root 4096 May 31 19:47 . dr-xr-xr-x. 25 root root 4096 May 31 19:38 .. drwx------. 2 root root 16384 May 31 14:18 lost+found
7.2.2.3.2. Filesystem-based storage pool parameters
The following provides information about the required parameters for a directory-based storage pool and an example.
Parameters
The following table provides a list of required parameters for the XML file for a filesystem-based storage pool.
Table 7.3. Filesystem-based storage pool parameters
| Description | XML |
|---|---|
| The type of storage pool |
|
| The name of the storage pool |
|
|
The path specifying the partition. For example, |
|
| The filesystem type, for example ext4. |
|
| The path specifying the target. This will be the path used for the storage pool. |
|
Example
The following is an example of an XML file for a storage pool based on the /dev/sdc1 partition:
<pool type='fs'>
  <name>guest_images_fs</name>
  <source>
    <device path='/dev/sdc1'/>
    <format type='auto'/>
  </source>
  <target>
    <path>/guest_images</path>
  </target>
</pool>
7.2.2.4. Creating and assigning GlusterFS storage for virtual machines using the CLI
The following provides information about creating directory-based storage pools and storage volumes and assigning volumes to virtual machines.
7.2.2.4.1. Creating GlusterFS-based storage pools using the CLI
GlusterFS is a user space file system that uses File System in Userspace (FUSE).
The following provides instructions for creating GlusterFS-based storage pools.
Prerequisites
Before a GlusterFS-based storage pool can be created on a host, a Gluster server must be prepared.
Obtain the IP address of the Gluster server by listing its status with the following command:
# gluster volume status Status of volume: gluster-vol1 Gluster process Port Online Pid ------------------------------------------------------------ Brick 222.111.222.111:/gluster-vol1 49155 Y 18634 Task Status of Volume gluster-vol1 ------------------------------------------------------------ There are no active volume tasks-
If not installed, install the
glusterfs-fusepackage. If not enabled, enable the
virt_use_fusefsboolean. Check that it is enabled.# setsebool virt_use_fusefs on # getsebool virt_use_fusefs virt_use_fusefs --> on
After ensuring that the required packages are installed and enabled, continue creating the storage pool.
Procedure
Define the storage pool in an XML file
Create a temporary XML file containing the storage pool parameters required for the new device.
NoteFor information on the required parameters, refer to Parameters.
Create a storage pool
Use the
virsh pool-definecommand to create a persistent storage pool based on the XML file created in the previous step.# virsh pool-define ~/guest_images.xml Pool defined from guest_images_fs
You can delete the XML file created in step 1 after running the virsh pool-define command.
Define the storage pool target path
Use the
virsh pool-buildcommand to create a storage pool target path for a pre-formatted file system storage pool, initialize the storage source device, and define the format of the data.# virsh pool-build guest_images_fs Pool guest_images_fs built # ls -la /guest_images total 8 drwx------. 2 root root 4096 May 31 19:38 . dr-xr-xr-x. 25 root root 4096 May 31 19:38 ..
NoteBuilding the target path is only necessary for disk-based, file system-based, and logical storage pools. If
libvirtdetects that the source storage device’s data format differs from the selected storage pool type, the build fails, unless theoverwriteoption is specified.Verify that the pool was created
Use the
virsh pool-listcommand to verify that the pool was created.# virsh pool-list --all Name State Autostart ----------------------------------------- default active yes guest_images_fs inactive noStart the storage pool
Use the
virsh pool-startcommand to mount the storage pool.# virsh pool-start guest_images_fs Pool guest_images_fs startedNoteThe
virsh pool-startcommand is only necessary for persistent storage pools. Transient storage pools are automatically started when they are created.[Optional] Turn on autostart
By default, a storage pool defined with the
virshcommand is not set to automatically start each time libvirtd starts. Use thevirsh pool-autostartcommand to configure the storage pool to autostart.# virsh pool-autostart guest_images_fs Pool guest_images_fs marked as autostartedVerify the
AutostartstateUse the
virsh pool-listcommand to verify theAutostartstate.# virsh pool-list --all Name State Autostart ----------------------------------------- default active yes guest_images_fs inactive yesVerify the storage pool
Verify that the storage pool was created correctly, the sizes reported are as expected, and the state is reported as
running. Verify there is alost+founddirectory in the target path on the file system, indicating that the device is mounted.# virsh pool-info guest_images_fs Name: guest_images_fs UUID: c7466869-e82a-a66c-2187-dc9d6f0877d0 State: running Persistent: yes Autostart: yes Capacity: 458.39 GB Allocation: 197.91 MB Available: 458.20 GB # mount | grep /guest_images /dev/sdc1 on /guest_images type ext4 (rw) # ls -la /guest_images total 24 drwxr-xr-x. 3 root root 4096 May 31 19:47 . dr-xr-xr-x. 25 root root 4096 May 31 19:38 .. drwx------. 2 root root 16384 May 31 14:18 lost+found
7.2.2.4.2. GlusterFS-based storage pool parameters
The following provides information about the required parameters for a GlusterFS-based storage pool and an example.
Parameters
The following table provides a list of required parameters for the XML file for a GlusterFS-based storage pool.
Table 7.4. GlusterFS-based storage pool parameters
| Description | XML |
|---|---|
| The type of storage pool |
|
| The name of the storage pool |
|
| The hostname or IP address of the Gluster server |
|
| The name of the Gluster server |
|
| The path on the Gluster server used for the storage pool. |
|
Example
The following is an example of an XML file for a storage pool based on the Gluster file system at 111.222.111.222:
<pool type='gluster'>
  <name>Gluster_pool</name>
  <source>
    <host name='111.222.111.222'/>
    <dir path='/'/>
    <name>gluster-vol1</name>
  </source>
</pool>
7.2.2.5. Creating and assigning iSCSI-based storage for virtual machines using the CLI
The following provides information about creating iSCSI-based storage pools and storage volumes, securing iSCSI-based storage pools with libvirt secrets, and assigning volumes to virtual machines.
Recommendations
Internet Small Computer System Interface (iSCSI) is a network protocol for sharing storage devices. iSCSI connects initiators (storage clients) to targets (storage servers) using SCSI instructions over the IP layer.
Using iSCSI-based devices to store virtual machines allows for more flexible storage options, such as using iSCSI as a block storage device. The iSCSI devices use a Linux-IO (LIO) target. This is a multi-protocol SCSI target for Linux. In addition to iSCSI, LIO also supports Fibre Channel and Fibre Channel over Ethernet (FCoE).
If you need to prevent access to an iSCSI storage pool, you can secure it using a libvirt secret.
Prerequisites
Before an iSCSI-based storage pool can be created, iSCSI targets must be created. iSCSI targets are created with the
targetclipackage, which provides a command set for creating software-backed iSCSI targets.For more information and instructions on creating iSCSI targets, see the Red Hat Enterprise Linux Storage Administration Guide.
7.2.2.5.1. Creating iSCSI-based storage pools using the CLI
The following provides instructions for creating iSCSI-based storage pools.
Procedure
Define the storage pool in an XML file
Create a temporary XML file containing the storage pool parameters required for the new device.
NoteFor information on the required parameters, refer to Parameters.
Create a storage pool
Use the
virsh pool-definecommand to create a persistent storage pool based on the XML file created in the previous step.# virsh pool-define ~/guest_images.xml Pool defined from guest_images_fs
You can delete the XML file created in step 1 after running the virsh pool-define command.
Verify that the pool was created
Use the
virsh pool-listcommand to verify that the pool was created.# virsh pool-list --all Name State Autostart ----------------------------------------- default active yes guest_images_fs inactive noStart the storage pool
Use the
virsh pool-startcommand to mount the storage pool.# virsh pool-start guest_images_fs Pool guest_images_fs startedNoteThe
virsh pool-startcommand is only necessary for persistent storage pools. Transient storage pools are automatically started when they are created.[Optional] Turn on autostart
By default, a storage pool defined with the
virshcommand is not set to automatically start each time libvirtd starts. Use thevirsh pool-autostartcommand to configure the storage pool to autostart.# virsh pool-autostart guest_images_fs Pool guest_images_fs marked as autostartedVerify the
AutostartstateUse the
virsh pool-listcommand to verify theAutostartstate.# virsh pool-list --all Name State Autostart ----------------------------------------- default active yes guest_images_fs inactive yesVerify the storage pool
Verify that the storage pool was created correctly, the sizes reported are as expected, and the state is reported as
running. Verify there is alost+founddirectory in the target path on the file system, indicating that the device is mounted.# virsh pool-info guest_images_fs Name: guest_images_fs UUID: c7466869-e82a-a66c-2187-dc9d6f0877d0 State: running Persistent: yes Autostart: yes Capacity: 458.39 GB Allocation: 197.91 MB Available: 458.20 GB # mount | grep /guest_images /dev/sdc1 on /guest_images type ext4 (rw) # ls -la /guest_images total 24 drwxr-xr-x. 3 root root 4096 May 31 19:47 . dr-xr-xr-x. 25 root root 4096 May 31 19:38 .. drwx------. 2 root root 16384 May 31 14:18 lost+found
7.2.2.5.2. iSCSI-based storage pool parameters
The following provides information about the required parameters for an iSCSI-based storage pool and an example.
Parameters
The following table provides a list of required parameters for the XML file for an iSCSI-based storage pool.
Table 7.5. iSCSI-based storage pool parameters
| Description | XML |
|---|---|
| The type of storage pool |
|
| The name of the storage pool |
|
| The name of the host |
|
| The iSCSI IQN |
|
| The path specifying the target. This will be the path used for the storage pool. |
|
| [Optional] The IQN of the iSCSI initiator. This is only needed when the ACL restricts the LUN to a particular initiator. |
|
The IQN of the iSCSI initiator can be determined using the virsh find-storage-pool-sources-as iscsi command.
Example
The following is an example of an XML file for a storage pool based on the specified iSCSI device:
<pool type='iscsi'>
<name>iSCSI_pool</name>
<source>
<host name='server1.example.com'/>
<device path='iqn.2010-05.com.example.server1:iscsirhel7guest'/>
</source>
<target>
    <path>/dev/disk/by-path</path>
 </target>
</pool>7.2.2.5.3. Securing iSCSI storage pools with libvirt secrets
User name and password parameters can be configured with virsh to secure an iSCSI storage pool. This can be configured before or after the pool is defined, but the pool must be started for the authentication settings to take effect.
The following provides instructions for securing iSCSI-based storage pools with libvirt secrets.
This procedure is required if a user_ID and password were defined when creating the iSCSI target.
Procedure
Create a libvirt secret file with a challenge-handshake authentication protocol (CHAP) user name. For example:
<secret ephemeral='no' private='yes'>
    <description>Passphrase for the iSCSI example.com server</description>
    <usage type='iscsi'>
        <target>iscsirhel7secret</target>
    </usage>
</secret>
Define the libvirt secret with the
virsh secret-definecommand.# virsh secret-define secret.xmlVerify the UUID with the
virsh secret-listcommand.# virsh secret-list UUID Usage ------------------------------------------------------------------- 2d7891af-20be-4e5e-af83-190e8a922360 iscsi iscsirhel7secretAssign a secret to the UUID in the output of the previous step using the
virsh secret-set-valuecommand. This ensures that the CHAP username and password are in a libvirt-controlled secret list. For example:# MYSECRET=`printf *%s "password123" | base64` # virsh secret-set-value 2d7891af-20be-4e5e-af83-190e8a922360 $MYSECRET
Add an authentication entry in the storage pool’s XML file using the
virsh editcommand, and add an<auth>element, specifyingauthentication type,username, andsecret usage.For example:
<pool type='iscsi'> <name>iscsirhel7pool</name> <source> <host name='192.168.122.1'/> <device path='iqn.2010-05.com.example.server1:iscsirhel7guest'/> <auth type='chap' username='redhat'> <secret usage='iscsirhel7secret'/> </auth> </source> <target> <path>/dev/disk/by-path</path> </target> </pool>NoteThe
<auth>sub-element exists in different locations within the guest XML’s<pool>and<disk>elements. For a<pool>,<auth>is specified within the<source>element, as this describes where to find the pool sources, since authentication is a property of some pool sources (iSCSI and RBD). For a<disk>, which is a sub-element of a domain, the authentication to the iSCSI or RBD disk is a property of the disk. In addition, the<auth>sub-element for a disk differs from that of a storage pool.<auth username='redhat'> <secret type='iscsi' usage='iscsirhel7secret'/> </auth>
To activate the changes, the storage pool must be activated. If the pool has already been started, stop and restart the storage pool:
# virsh pool-destroy iscsirhel7pool# virsh pool-start iscsirhel7pool
7.2.2.6. Creating and assigning LVM-based storage for virtual machines using the CLI
The following provides information about creating LVM-based storage pools and storage volumes and assigning volumes to virtual machines.
7.2.2.6.1. Creating LVM-based storage pools using the CLI
The following provides instructions for creating LVM-based storage pools.
Recommendations
Be aware of the following before creating an LVM-based storage pool:
- LVM-based storage pools do not provide the full flexibility of LVM.
-
libvirtsupports thin logical volumes, but does not provide the features of thin storage pools. LVM-based storage pools are volume groups. You can create volume groups using Logical Volume Manager commands or
virshcommands. To manage volume groups using thevirshinterface, use thevirshcommands to create volume groups.For more information about volume groups, refer to the Red Hat Enterprise Linux Logical Volume Manager Administration Guide.
- LVM-based storage pools require a full disk partition. If activating a new partition or device with these procedures, the partition will be formatted and all data will be erased. If using the host’s existing Volume Group (VG) nothing will be erased. It is recommended to back up the storage device before starting.
Procedure
Define the storage pool in an XML file
Create a temporary XML file containing the storage pool parameters required for the new device.
NoteFor information on the required parameters, refer to Parameters.
Create a storage pool
Use the
virsh pool-definecommand to create a persistent storage pool based on the XML file created in the previous step.# virsh pool-define ~/guest_images.xml Pool defined from guest_images_fs
You can delete the XML file created in step 1 after running the virsh pool-define command.
Verify that the pool was created
Use the
virsh pool-listcommand to verify that the pool was created.# virsh pool-list --all Name State Autostart ----------------------------------------- default active yes guest_images_fs inactive noStart the storage pool
Use the
virsh pool-startcommand to mount the storage pool.# virsh pool-start guest_images_fs Pool guest_images_fs startedNoteThe
virsh pool-startcommand is only necessary for persistent storage pools. Transient storage pools are automatically started when they are created.[Optional] Turn on autostart
By default, a storage pool defined with the
virshcommand is not set to automatically start each time libvirtd starts. Use thevirsh pool-autostartcommand to configure the storage pool to autostart.# virsh pool-autostart guest_images_fs Pool guest_images_fs marked as autostartedVerify the
AutostartstateUse the
virsh pool-listcommand to verify theAutostartstate.# virsh pool-list --all Name State Autostart ----------------------------------------- default active yes guest_images_fs inactive yesVerify the storage pool
Verify that the storage pool was created correctly, the sizes reported are as expected, and the state is reported as
running. Verify there is alost+founddirectory in the target path on the file system, indicating that the device is mounted.# virsh pool-info guest_images_fs Name: guest_images_fs UUID: c7466869-e82a-a66c-2187-dc9d6f0877d0 State: running Persistent: yes Autostart: yes Capacity: 458.39 GB Allocation: 197.91 MB Available: 458.20 GB # mount | grep /guest_images /dev/sdc1 on /guest_images type ext4 (rw) # ls -la /guest_images total 24 drwxr-xr-x. 3 root root 4096 May 31 19:47 . dr-xr-xr-x. 25 root root 4096 May 31 19:38 .. drwx------. 2 root root 16384 May 31 14:18 lost+found
7.2.2.6.2. LVM-based storage pool parameters
The following provides information about the required parameters for an LVM-based storage pool and an example.
Parameters
The following table provides a list of required parameters for the XML file for a LVM-based storage pool.
Table 7.6. LVM-based storage pool parameters
| Description | XML |
|---|---|
| The type of storage pool |
|
| The name of the storage pool |
|
| The path to the device for the storage pool |
|
| The name of the volume group |
|
| The virtual group format |
|
| The target path |
|
If the logical volume group is made of multiple disk partitions, there may be multiple source devices listed. For example:
<source>
  <device path='/dev/sda1'/>
  <device path='/dev/sdb3'/>
  <device path='/dev/sdc2'/>
  ...
</source>
Example
The following is an example of an XML file for a storage pool based on the specified LVM:
<pool type='logical'>
  <name>guest_images_lvm</name>
  <source>
    <device path='/dev/sdc'/>
    <name>libvirt_lvm</name>
    <format type='lvm2'/>
  </source>
  <target>
    <path>/dev/libvirt_lvm</path>
  </target>
</pool>
7.2.2.7. Creating and assigning network-based storage for virtual machines using the CLI
The following provides information about creating network-based storage pools and storage volumes and assigning volumes to virtual machines.
7.2.2.7.1. Prerequisites
- To create an Network File System (NFS)-based storage pool, an NFS Server should already be configured to be used by the host machine. For more information about NFS, refer to the Red Hat Enterprise Linux Storage Administration Guide.
-
Ensure that the required utilities for the file system used is installed on the host. For example,
cifs-utilsfor Common Internet File Systems (CIFS) andglusterfs.fusefor GlusterFS.
7.2.2.7.2. Creating network-based storage pools using the CLI
The following provides instructions for creating network-based storage pools.
Procedure
Define the storage pool in an XML file
Create a temporary XML file containing the storage pool parameters required for the new device.
NoteFor information on the required parameters, refer to Parameters.
Create a storage pool
Use the
virsh pool-definecommand to create a persistent storage pool based on the XML file created in the previous step.# virsh pool-define ~/guest_images.xml Pool defined from guest_images_fs
You can delete the XML file created in step 1 after running the virsh pool-define command.
Define the storage pool target path
Use the
virsh pool-buildcommand to create a storage pool target path for a pre-formatted file system storage pool, initialize the storage source device, and define the format of the data.# virsh pool-build guest_images_fs Pool guest_images_fs built # ls -la /guest_images total 8 drwx------. 2 root root 4096 May 31 19:38 . dr-xr-xr-x. 25 root root 4096 May 31 19:38 ..
Verify that the pool was created
Use the
virsh pool-listcommand to verify that the pool was created.# virsh pool-list --all Name State Autostart ----------------------------------------- default active yes guest_images_fs inactive noStart the storage pool
Use the
virsh pool-startcommand to mount the storage pool.# virsh pool-start guest_images_fs Pool guest_images_fs startedNoteThe
virsh pool-startcommand is only necessary for persistent storage pools. Transient storage pools are automatically started when they are created.[Optional] Turn on autostart
By default, a storage pool defined with the
virshcommand is not set to automatically start each time libvirtd starts. Use thevirsh pool-autostartcommand to configure the storage pool to autostart.# virsh pool-autostart guest_images_fs Pool guest_images_fs marked as autostartedVerify the
AutostartstateUse the
virsh pool-listcommand to verify theAutostartstate.# virsh pool-list --all Name State Autostart ----------------------------------------- default active yes guest_images_fs inactive yesVerify the storage pool
Verify that the storage pool was created correctly, the sizes reported are as expected, and the state is reported as
running. Verify there is alost+founddirectory in the target path on the file system, indicating that the device is mounted.# virsh pool-info guest_images_fs Name: guest_images_fs UUID: c7466869-e82a-a66c-2187-dc9d6f0877d0 State: running Persistent: yes Autostart: yes Capacity: 458.39 GB Allocation: 197.91 MB Available: 458.20 GB # mount | grep /guest_images /dev/sdc1 on /guest_images type ext4 (rw) # ls -la /guest_images total 24 drwxr-xr-x. 3 root root 4096 May 31 19:47 . dr-xr-xr-x. 25 root root 4096 May 31 19:38 .. drwx------. 2 root root 16384 May 31 14:18 lost+found
7.2.2.7.3. NFS-based storage pool parameters
The following provides information about the required parameters for an NFS-based storage pool and an example.
Parameters
The following table provides a list of required parameters for the XML file for an NFS-based storage pool.
Table 7.7. NFS-based storage pool parameters
| Description | XML |
|---|---|
| The type of storage pool |
|
| The name of the storage pool |
|
| The hostname of the network server where the mount point is located. This can be a hostname or an IP address. |
|
| The format of the storage pool | One of the following:
|
| The directory used on the network server |
|
| The path specifying the target. This will be the path used for the storage pool. |
|
Example
The following is an example of an XML file for a storage pool based on the /home/net_mount directory of the file_server NFS server:
<pool type='netfs'>
  <name>nfspool</name>
  <source>
    <host name='file_server'/>
    <format type='nfs'/>
    <dir path='/home/net_mount'/>
  </source>
  <target>
    <path>/var/lib/libvirt/images/nfspool</path>
  </target>
</pool>
7.2.2.8. Creating and assigning vHBA-based storage for virtual machines using the CLI
The following provides information about creating vHBA-based storage pools and storage volumes and assigning volumes to virtual machines.
7.2.2.8.1. Recommendations
N_Port ID Virtualization (NPIV) is a software technology that allows sharing of a single physical Fibre Channel host bus adapter (HBA). This allows multiple guests to see the same storage from multiple physical hosts, and thus allows for easier migration paths for the storage. As a result, there is no need for the migration to create or copy storage, as long as the correct storage path is specified.
In virtualization, the virtual host bus adapter, or vHBA, controls the Logical Unit Numbers (LUNs) for virtual machines. For a host to share one Fibre Channel device path between multiple KVM guests, a vHBA must be created for each virtual machine. A single vHBA must not be used by multiple KVM guests.
Each vHBA for NPIV is identified by its parent HBA and its own World Wide Node Name (WWNN) and World Wide Port Name (WWPN). The path to the storage is determined by the WWNN and WWPN values. The parent HBA can be defined as scsi_host# or as a WWNN/WWPN pair.
If a parent HBA is defined as scsi_host# and hardware is added to the host machine, the scsi_host# assignment may change. Therefore, it is recommended that you define a parent HBA using a WWNN/WWPN pair.
It is recommended that you define a libvirt storage pool based on the vHBA, because this preserves the vHBA configuration.
Using a libvirt storage pool has two primary advantages:
- The libvirt code can easily find the LUN’s path via virsh command output.
- Virtual machine migration requires only defining and starting a storage pool with the same vHBA name on the target machine. To do this, the vHBA LUN, libvirt storage pool and volume name must be specified in the virtual machine’s XML configuration.
Before creating a vHBA, it is recommended that you configure storage array (SAN)-side zoning in the host LUN to provide isolation between guests and prevent the possibility of data corruption.
To create a persistent vHBA configuration, first create a libvirt 'scsi' storage pool XML file. For information on the XML file, see Creating vHBAs. When creating a single vHBA that uses a storage pool on the same physical HBA, it is recommended to use a stable location for the <path> value, such as one of the /dev/disk/by-{path|id|uuid|label} locations on your system.
When creating multiple vHBAs that use storage pools on the same physical HBA, the value of the <path> field must be only /dev/, otherwise storage pool volumes are visible only to one of the vHBAs, and devices from the host cannot be exposed to multiple guests with the NPIV configuration.
For more information on <path> and the elements in <target>, see upstream libvirt documentation.
7.2.2.8.2. Prerequisites
Before creating a vHBA-based storage pools with SCSI devices, create a vHBA.
7.2.2.8.3. Creating vHBAs
The following provides instructions on creating a virtual host bus adapter (vHBA).
Procedure
Locate the HBAs on your host system, using the
virsh nodedev-list --cap vportscommand.The following example shows a host that has two HBAs that support vHBA:
# virsh nodedev-list --cap vports
scsi_host3
scsi_host4
View the HBA’s details, using the
virsh nodedev-dumpxml HBA_devicecommand.# virsh nodedev-dumpxml scsi_host3The output from the command lists the
<name>,<wwnn>, and<wwpn>fields, which are used to create a vHBA.<max_vports>shows the maximum number of supported vHBAs. For example:<device> <name>scsi_host3</name> <path>/sys/devices/pci0000:00/0000:00:04.0/0000:10:00.0/host3</path> <parent>pci_0000_10_00_0</parent> <capability type='scsi_host'> <host>3</host> <unique_id>0</unique_id> <capability type='fc_host'> <wwnn>20000000c9848140</wwnn> <wwpn>10000000c9848140</wwpn> <fabric_wwn>2002000573de9a81</fabric_wwn> </capability> <capability type='vport_ops'> <max_vports>127</max_vports> <vports>0</vports> </capability> </capability> </device>In this example, the
<max_vports>value shows there are a total 127 virtual ports available for use in the HBA configuration. The<vports>value shows the number of virtual ports currently being used. These values update after creating a vHBA.Create an XML file similar to one of the following for the vHBA host. In these examples, the file is named
vhba_host3.xml.This example uses
scsi_host3to describe the parent vHBA.<device> <parent>scsi_host3</parent> <capability type='scsi_host'> <capability type='fc_host'> </capability> </capability> </device>This example uses a WWNN/WWPN pair to describe the parent vHBA.
<device> <name>vhba</name> <parent wwnn='20000000c9848140' wwpn='10000000c9848140'/> <capability type='scsi_host'> <capability type='fc_host'> </capability> </capability> </device>NoteThe WWNN and WWPN values must match those in the HBA details seen in the previous step.
The
<parent>field specifies the HBA device to associate with this vHBA device. The details in the<device>tag are used in the next step to create a new vHBA device for the host. For more information on thenodedevXML format, see the libvirt upstream pages.NoteThe
virshcommand does not provide a way to define theparent_wwnn,parent_wwpn, orparent_fabric_wwnattributes.Create a VHBA based on the XML file created in the previous step using the
virsh nodev-createcommand.# virsh nodedev-create vhba_host3 Node device scsi_host5 created from vhba_host3.xmlVerify the new vHBA’s details (scsi_host5) uaing the
virsh nodedev-dumpxmlcommand:# virsh nodedev-dumpxml scsi_host5 <device> <name>scsi_host5</name> <path>/sys/devices/pci0000:00/0000:00:04.0/0000:10:00.0/host3/vport-3:0-0/host5</path> <parent>scsi_host3</parent> <capability type='scsi_host'> <host>5</host> <unique_id>2</unique_id> <capability type='fc_host'> <wwnn>5001a4a93526d0a1</wwnn> <wwpn>5001a4ace3ee047d</wwpn> <fabric_wwn>2002000573de9a81</fabric_wwn> </capability> </capability> </device>
7.2.2.8.4. Creating vHBA-based storage pools using the CLI
The following provides instructions for creating vHBA-based storage pools.
Prerequisites
- Ensure that there are vHBAs. For more information, see Creating vHBAs.
Procedure
Define the storage pool in an XML file
Create a temporary XML file containing the storage pool parameters required for the new device.
NoteFor information on the required parameters, refer to Parameters.
Create a storage pool
Use the
virsh pool-definecommand to create a persistent storage pool based on the XML file created in the previous step.# virsh pool-define ~/guest_images.xml Pool defined from guest_images_fs
You can delete the XML file created in step 1 after running the virsh pool-define command.
Verify that the pool was created
Use the
virsh pool-listcommand to verify that the pool was created.# virsh pool-list --all Name State Autostart ----------------------------------------- default active yes guest_images_fs inactive noStart the storage pool
Use the
virsh pool-startcommand to mount the storage pool.# virsh pool-start guest_images_fs Pool guest_images_fs startedNoteThe
virsh pool-startcommand is only necessary for persistent storage pools. Transient storage pools are automatically started when they are created.[Optional] Turn on autostart
By default, a storage pool defined with the
virshcommand is not set to automatically start each time libvirtd starts. Use thevirsh pool-autostartcommand to configure the storage pool to autostart.# virsh pool-autostart guest_images_fs Pool guest_images_fs marked as autostartedVerify the
AutostartstateUse the
virsh pool-listcommand to verify theAutostartstate.# virsh pool-list --all Name State Autostart ----------------------------------------- default active yes guest_images_fs inactive yesVerify the storage pool
Verify that the storage pool was created correctly, the sizes reported are as expected, and the state is reported as
running. Verify there is alost+founddirectory in the target path on the file system, indicating that the device is mounted.# virsh pool-info guest_images_fs Name: guest_images_fs UUID: c7466869-e82a-a66c-2187-dc9d6f0877d0 State: running Persistent: yes Autostart: yes Capacity: 458.39 GB Allocation: 197.91 MB Available: 458.20 GB # mount | grep /guest_images /dev/sdc1 on /guest_images type ext4 (rw) # ls -la /guest_images total 24 drwxr-xr-x. 3 root root 4096 May 31 19:47 . dr-xr-xr-x. 25 root root 4096 May 31 19:38 .. drwx------. 2 root root 16384 May 31 14:18 lost+found
7.2.2.8.5. vHBA-based storage pool parameters
The following provides information about the required parameters for a vHBA-based storage pool and an example.
Parameters
The following table provides a list of required parameters for the XML file for a vHBA-based storage pool.
Table 7.8. vHBA-based storage pool parameters
| Description | XML |
|---|---|
| The type of storage pool |
|
| The name of the storage pool |
|
|
The identifier of the vHBA. The |
|
| The target path. This will be the path used for the storage pool. |
|
When the <path> field is /dev/, libvirt generates a unique short device path for the volume device path. For example, /dev/sdc. Otherwise, the physical host path is used. For example, /dev/disk/by-path/pci-0000:10:00.0-fc-0x5006016044602198-lun-0. The unique short device path allows the same volume to be listed in multiple guests by multiple storage pools. If the physical host path is used by multiple guests, duplicate device type warnings may occur.
The parent attribute can be used in the <adapter> field to identify the physical HBA parent from which the NPIV LUNs by varying paths can be used. This field, scsi_hostN, is combined with the vports and max_vports attributes to complete the parent identification. The parent, parent_wwnn, parent_wwpn, or parent_fabric_wwn attributes provide varying degrees of assurance that after the host reboots the same HBA is used.
-
If no
parentis specified,libvirtuses the firstscsi_hostNadapter that supports NPIV. -
If only the
parentis specified, problems can arise if additional SCSI host adapters are added to the configuration. -
If
parent_wwnnorparent_wwpnis specified, after the host reboots the same HBA is used. -
If
parent_fabric_wwnis used, after the host reboots an HBA on the same fabric is selected, regardless of thescsi_hostNused.
Examples
The following are examples of XML files for vHBA-based storage pools.
The following is an example of a storage pool that is the only storage pool on the HBA:
<pool type='scsi'>
  <name>vhbapool_host3</name>
  <source>
    <adapter type='fc_host' wwnn='5001a4a93526d0a1' wwpn='5001a4ace3ee047d'/>
  </source>
  <target>
    <path>/dev/disk/by-path</path>
  </target>
</pool>
The following is an example of a storage pool that is one of several storage pools that use a single vHBA and uses the parent attribute to identify the SCSI host device:
<pool type='scsi'>
  <name>vhbapool_host3</name>
  <source>
    <adapter type='fc_host' parent='scsi_host3' wwnn='5001a4a93526d0a1' wwpn='5001a4ace3ee047d'/>
  </source>
  <target>
    <path>/dev/disk/by-path</path>
  </target>
</pool>
7.2.2.8.6. Assigning and connecting SCSI LUN-based storage volumes to virtual machines using the CLI
The following provides information on how to configure a virtual machine to use a vHBA LUN and how to reconnect to an exposed LUN after a hardware failure.
7.2.2.8.6.1. Prerequisites
- Ensure that there are one or more vHBA storage pools.
7.2.2.8.6.2. Creating vHBA-based storage pools using the CLI
The following provides instructions for creating vHBA-based storage pools.
- Ensure that there are vHBAs. For more information, see Creating vHBAs.
Define the storage pool in an XML file
Create a temporary XML file containing the storage pool parameters required for the new device.
NoteFor information on the required parameters, refer to Parameters.
Create a storage pool
Use the
virsh pool-definecommand to create a persistent storage pool based on the XML file created in the previous step.# virsh pool-define ~/guest_images.xml Pool defined from guest_images_fs
You can delete the XML file created in step 1 after running the virsh pool-define command.
Verify that the pool was created
Use the
virsh pool-listcommand to verify that the pool was created.# virsh pool-list --all Name State Autostart ----------------------------------------- default active yes guest_images_fs inactive noStart the storage pool
Use the
virsh pool-startcommand to mount the storage pool.# virsh pool-start guest_images_fs Pool guest_images_fs startedNoteThe
virsh pool-startcommand is only necessary for persistent storage pools. Transient storage pools are automatically started when they are created.[Optional] Turn on autostart
By default, a storage pool defined with the
virshcommand is not set to automatically start each time libvirtd starts. Use thevirsh pool-autostartcommand to configure the storage pool to autostart.# virsh pool-autostart guest_images_fs Pool guest_images_fs marked as autostartedVerify the
AutostartstateUse the
virsh pool-listcommand to verify theAutostartstate.# virsh pool-list --all Name State Autostart ----------------------------------------- default active yes guest_images_fs inactive yesVerify the storage pool
Verify that the storage pool was created correctly, the sizes reported are as expected, and the state is reported as
running. Verify there is alost+founddirectory in the target path on the file system, indicating that the device is mounted.# virsh pool-info guest_images_fs Name: guest_images_fs UUID: c7466869-e82a-a66c-2187-dc9d6f0877d0 State: running Persistent: yes Autostart: yes Capacity: 458.39 GB Allocation: 197.91 MB Available: 458.20 GB # mount | grep /guest_images /dev/sdc1 on /guest_images type ext4 (rw) # ls -la /guest_images total 24 drwxr-xr-x. 3 root root 4096 May 31 19:47 . dr-xr-xr-x. 25 root root 4096 May 31 19:38 .. drwx------. 2 root root 16384 May 31 14:18 lost+found
7.2.2.9. Creating and assigning storage volumes using the CLI
The following provides information on creating storage volumes from storage pools and assigning the storage volumes to virtual machines using the CLI. The procedure is the same for all types of storage pools.
7.2.2.9.1. Prerequisites
- Storage pools on the host with unallocated space
7.2.2.9.2. Procedure
Define a storage volume in an XML file
Create a temporary XML file containing the storage volume’s parameters.
The following is a list of required storage volume parameters:
- name - The name of the storage volume.
- allocation - The total storage allocation for the storage volume.
-
capacity - The logical capacity of the storage volume. If the volume is sparse, this value can differ from the
allocationvalue. target - The path to the storage volume on the host system and optionally its permissions and label.
The following shows an example a storage volume definition XML file. In this example, the file is saved to
~/guest_volume.xml.<volume> <name>volume1</name> <allocation>0</allocation> <capacity>20G</capacity> <target> <path>/var/lib/virt/images/sparse.img</path> </target> </volume>
Create and assign the storage volume
The
virsh vol-createandvirsh vol-create-ascommands are used to create storage volumes from most storage pools types.The following is a list of the storage pool types that do not support the
virsh vol-createandvirsh vol-create-ascommands and the methods to use with each of them to create storage volumes:-
GlusterFS-based - Use the
qemu-imgcommand to create storage volumes. - iSCSI-based - Prepare the iSCSI LUNs in advance on the iSCSI server.
-
Multipath-based - Use the
multipathdcommand to prepare or manage the multipath. - vHBA-based - Prepare the fibre channel card in advance.
Use the
virsh vol-createcommand to create and assign the storage volume based on the XML file. Specify the virtual machine to which the storage volume will be assigned in thevirsh vol-createcommand.# virsh vol-create guest_images_dir ~/guest_volume.xml Vol volume1 createdNoteYou can delete the XML file created in step 1 after running the
virsh vol-createcommand.For GlusterFS-based, multipath-based, and RBD-based storage pools, describe the storage volume using the following XML format and add it to the domain XML:
  <disk type='network' device='disk'>
    <driver name='qemu' type='raw'/>
    <source protocol='gluster' name='Volume1/Image'>
      <host name='example.org' port='6000'/>
    </source>
    <target dev='vda' bus='virtio'/>
    <address type='pci' domain='0x0000' bus='0x00' slot='0x03' function='0x0'/>
  </disk>
For multipath-based storage pools, describe the storage volume using the following XML format and add it to the domain XML:
<disk type='block' device='disk'>
<driver name='qemu' type='raw'/>
<source dev='/dev/mapper/mpatha' />
<target dev='sdc' bus='scsi'/>
</disk>
For RBD-based storage pools, describe the storage volume using the following XML format and add it to the domain XML:
<disk type='network' device='disk'> <driver name='qemu' type='raw'/> <source protocol='rbd' name='pool/image'> <host name='mon1.example.org' port='6321'/> </source> <target dev='vdc' bus='virtio'/> </disk>-
GlusterFS-based - Use the
7.2.3. Deleting storage for virtual machines using the CLI
The following provides information about deleting storage pools and storage volumes using the CLI.
7.2.3.1. Deleting storage pools using the CLI
The following provides information on deleting storage pools.
Prerequisites
- To avoid negatively affecting other virtual machines that use the storage pool you want to delete, it is recommended that you stop the storage pool and release any resources being used by it.
Procedure
List the defined storage pools using the
virsh pool-listcommand.# virsh pool-list --all Name State Autostart ------------------------------------------- default active yes Downloads active yes RHEL8-Storage-Pool active yesStop the storage pool you want to delete using the
virsh pool-destroycommand.# virsh pool-destroy Downloads Pool Downloads destroyed(Optional) For some some types of storage pools, you can optionally remove the directory where the storage pool resides using the
virsh pool-deletecommand. Note that to remove the directory where the storage pool resides, it must be empty.# virsh pool-delete Downloads Pool Downloads deletedDelete the definition of the storage pool using the
virsh pool-undefinecommand.# virsh pool-undefine Downloads Pool Downloads has been undefinedConfirm that the storage pool was deleted.
# virsh pool-list --all
Name                 State      Autostart
-------------------------------------------
default              active     yes
RHEL8-Storage-Pool   active     yes
7.2.3.2. Deleting storage volumes using the CLI
The following provides information on deleting storage volumes using the CLI.
Prerequisites
- To avoid negatively affecting virtual machines that use the storage volume you want to delete, it is recommended that you release any resources using it.
Procedure
List the defined storage volumes in a storage pool using the
virsh vol-listcommand. The command must specify the name or path of a storage volume.# virsh vol-list --pool RHEL8-Storage-Pool Name Path --------------------------------------------------------------- .bash_history /home/VirtualMachines/.bash_history .bash_logout /home/VirtualMachines/.bash_logout .bash_profile /home/VirtualMachines/.bash_profile .bashrc /home/VirtualMachines/.bashrc .git-prompt.sh /home/VirtualMachines/.git-prompt.sh .gitconfig /home/VirtualMachines/.gitconfig RHEL8_Volume.qcow2 /home/VirtualMachines/RHEL8_Volume.qcow2Delete storage volumes using the
virsh vol-deletecommand. The command must specify the name or path of the storage volume and the storage pool from which the storage volume is abstracted.# virsh pool-delete RHEL8_Volume.qcow2 Pool RHEL8_Volume.qcow2 deleted
Chapter 8. Managing NVIDIA vGPU devices
The vGPU feature makes it possible to divide a physical NVIDIA GPU device into multiple virtual devices referred to as mediated devices. These mediated devices can then be assigned to multiple virtual machines (VMs) as virtual GPUs. As a result, these VMs share the performance of a single physical GPU.
Note, however, that assigning a physical GPU to VMs, with or without using mediated devices, makes it impossible for the host to use the GPU.
8.1. Setting up NVIDIA vGPU devices
To set up the NVIDIA vGPU feature, you need to obtain NVIDIA vGPU drivers for your GPU device, then create mediated devices, and assign them to the intended virtual machines. For detailed instructions, see below:
Prerequisites
Creating mediated vGPU devices is only possible on a limited set of NVIDIA GPUs. For an up-to-date list of these devices, see the NVIDIA GPU Software Documentation.
If you do not know which GPU your host is using, install the lshw package and use the
lshw -C displaycommand. The following example shows the system is using an NVIDIA Tesla P4 GPU, compatible with vGPU.# lshw -C display *-display description: 3D controller product: GP104GL [Tesla P4] vendor: NVIDIA Corporation physical id: 0 bus info: pci@0000:01:00.0 version: a1 width: 64 bits clock: 33MHz capabilities: pm msi pciexpress cap_list configuration: driver=vfio-pci latency=0 resources: irq:16 memory:f6000000-f6ffffff memory:e0000000-efffffff memory:f0000000-f1ffffff
Procedure
- Obtain the NVIDIA vGPU drivers and install them on your system. For instructions, see the NVIDIA documentation.
If the NVIDIA software installer did not create the /etc/modprobe.d/nvidia-installer-disable-nouveau.conf file, create a
conffile of any name in the /etc/modprobe.d/. Then, add the following lines in the file:blacklist nouveau options nouveau modeset=0
Regenerate the initial ramdisk for the current kernel, then reboot.
# dracut --force
# reboot
If you need to use a prior supported kernel version with mediated devices, regenerate the initial ramdisk for all installed kernel versions.
# dracut --regenerate-all --force
# reboot
Check that the
nvidia_vgpu_vfiomodule has been loaded by the kernel and that thenvidia-vgpu-mgr.serviceservice is running.# lsmod | grep nvidia_vgpu_vfio nvidia_vgpu_vfio 45011 0 nvidia 14333621 10 nvidia_vgpu_vfio mdev 20414 2 vfio_mdev,nvidia_vgpu_vfio vfio 32695 3 vfio_mdev,nvidia_vgpu_vfio,vfio_iommu_type1 # systemctl status nvidia-vgpu-mgr.service nvidia-vgpu-mgr.service - NVIDIA vGPU Manager Daemon Loaded: loaded (/usr/lib/systemd/system/nvidia-vgpu-mgr.service; enabled; vendor preset: disabled) Active: active (running) since Fri 2018-03-16 10:17:36 CET; 5h 8min ago Main PID: 1553 (nvidia-vgpu-mgr) [...]
Write a device UUID to the /sys/class/mdev_bus/
pci_dev/mdev_supported_types/type-id/create file, wherepci_devis the PCI address of the host GPU, andtype-idis an ID of the host GPU type.The following example shows how to create a mediated device of the
nvidia-63vGPU type on an NVIDIA Tesla P4 card:# uuidgen 30820a6f-b1a5-4503-91ca-0c10ba58692a # echo "30820a6f-b1a5-4503-91ca-0c10ba58692a" > /sys/class/mdev_bus/0000:01:00.0/mdev_supported_types/nvidia-63/create
NoteFor
type-idvalues for specific GPU devices, see the Virtual GPU software documentation. Note that only Q-series NVIDIA vGPUs, such as GRID P4-2Q, are supported as mediated device GPU types on Linux VMs.Add the following lines to the <devices/> sections in the XML configurations of guests that you want to share the vGPU resources. Use the UUID value generated by the uuidgen command in the previous step. Each UUID can only be assigned to one guest at a time.
<hostdev mode='subsystem' type='mdev' managed='no' model='vfio-pci'>
  <source>
    <address uuid='30820a6f-b1a5-4503-91ca-0c10ba58692a'/>
  </source>
</hostdev>
Additional resources
- For the vGPU mediated devices to work properly on the assigned guests, NVIDIA vGPU guest software licensing needs to be set up for the guests. For further information and instructions, see the NVIDIA virtual GPU software documentation.
8.2. Removing NVIDIA vGPU devices
To change the configuration of assigned vGPU mediated devices, the existing devices have to be removed from the assigned guests. For instructions to do so, see below:
Procedure
To remove a mediated vGPU device, use the following command when the device is inactive, and replace
uuidwith the UUID of the device, for example30820a6f-b1a5-4503-91ca-0c10ba58692a:# echo 1 > /sys/bus/mdev/devices/uuid/removeNote that attempting to remove a vGPU device that is currently in use by a VM triggers the following error:
echo: write error: Device or resource busy
8.3. Obtaining NVIDIA vGPU information about your system
To evaluate the capabilities of the vGPU features available to you, you can obtain additional information about mediated devices on your system, such as how many mediated devices of a given type can be created.
Procedure
Use the virsh nodedev-list --cap mdev_types and virsh nodedev-dumpxml commands.
For example, the following displays available vGPU types if you are using a physical Tesla P4 card:
$ virsh nodedev-list --cap mdev_types
pci_0000_01_00_0
$ virsh nodedev-dumpxml pci_0000_01_00_0
<...>
  <capability type='mdev_types'>
    <type id='nvidia-70'>
      <name>GRID P4-8A</name>
      <deviceAPI>vfio-pci</deviceAPI>
      <availableInstances>1</availableInstances>
    </type>
    <type id='nvidia-69'>
      <name>GRID P4-4A</name>
      <deviceAPI>vfio-pci</deviceAPI>
      <availableInstances>2</availableInstances>
    </type>
    <type id='nvidia-67'>
      <name>GRID P4-1A</name>
      <deviceAPI>vfio-pci</deviceAPI>
      <availableInstances>8</availableInstances>
    </type>
    <type id='nvidia-65'>
      <name>GRID P4-4Q</name>
      <deviceAPI>vfio-pci</deviceAPI>
      <availableInstances>2</availableInstances>
    </type>
    <type id='nvidia-63'>
      <name>GRID P4-1Q</name>
      <deviceAPI>vfio-pci</deviceAPI>
      <availableInstances>8</availableInstances>
    </type>
    <type id='nvidia-71'>
      <name>GRID P4-1B</name>
      <deviceAPI>vfio-pci</deviceAPI>
      <availableInstances>8</availableInstances>
    </type>
    <type id='nvidia-68'>
      <name>GRID P4-2A</name>
      <deviceAPI>vfio-pci</deviceAPI>
      <availableInstances>4</availableInstances>
    </type>
    <type id='nvidia-66'>
      <name>GRID P4-8Q</name>
      <deviceAPI>vfio-pci</deviceAPI>
      <availableInstances>1</availableInstances>
    </type>
    <type id='nvidia-64'>
      <name>GRID P4-2Q</name>
      <deviceAPI>vfio-pci</deviceAPI>
      <availableInstances>4</availableInstances>
    </type>
  </capability>
</...>
8.4. Remote desktop streaming services for NVIDIA vGPU
The following remote desktop streaming services have been successfully tested for use with the NVIDIA vGPU feature in RHEL 8 hosts:
- HP-RGS - Note that it is currently not possible to use HP-RGS with RHEL 8 VMs.
- Mechdyne TGX - Note that it is currently not possible to use Mechdyne TGX with Windows Server 2016 VMs.
- NICE DCV - When using this streaming service, Red Hat recommends using fixed resolution settings, as using dynamic resolution in some cases results in a black screen. In addition, it is currently not possible to use NICE DCV with RHEL 8 VMs.
Chapter 9. Understanding virtual networking
The connection of virtual machines to other devices and locations on a network has to be facilitated by the host hardware.
Virtual networking uses the concept of a virtual network switch. A virtual network switch is a software construct that operates on a host physical machine server. Virtual machines (guests) connect to the network through the virtual network switch.
The following figure shows a virtual network switch connecting two virtual machines to the network:
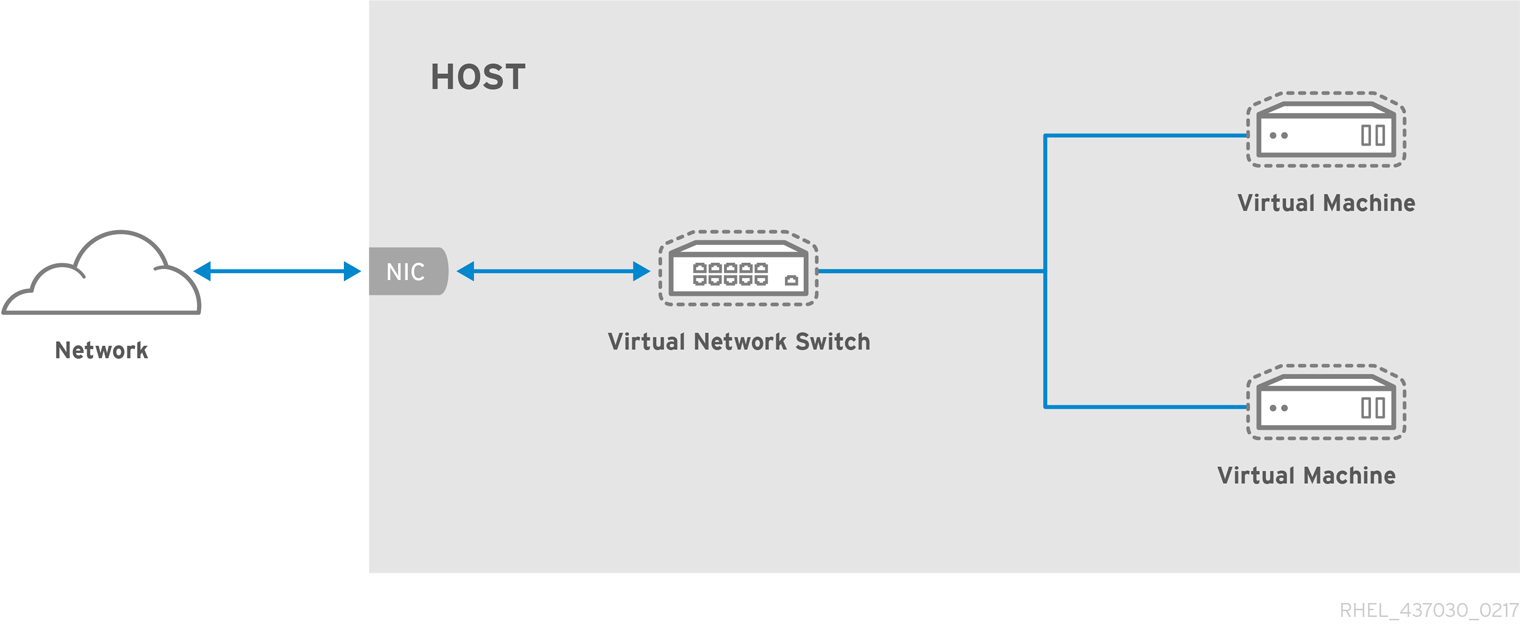
From the perspective of a guest operating system, a virtual network connection is the same as a physical network connection.
Host physical machine servers view virtual network switches as network interfaces. When the libvirtd daemon (libvirtd) is first installed and started, the default network interface representing the virtual network switch is virbr0.
This interface can be viewed with the ip command like any other network interface.
$ ip addr show virbr0
3: virbr0: <BROADCAST,MULTICAST,UP,LOWER_UP> mtu 1500 qdisc noqueue state
 UNKNOWN link/ether 1b:c4:94:cf:fd:17 brd ff:ff:ff:ff:ff:ff
 inet 192.168.122.1/24 brd 192.168.122.255 scope global virbr0
By default, all guests on a single host are connected to the same libvirt virtual network, named default. Guests on this network can make the following connections:
With each other and with the virtualization host
Both inbound and outbound traffic is possible, but is affected by the firewalls in the guest operating system’s network stack and by
libvirtnetwork filtering rules attached to the guest interface.With other hosts on the network beyond the virtualization host
Only outbound traffic is possible and is affected by Network Address Translation (NAT) rules, as well as the host system’s firewall.
For basic outbound-only network access from virtual machines, no additional network setup is usually needed, because the default network is installed along with the libvirt package, and automatically started when the libvirtd service is started.
If more advanced functionality is needed, additional networks can be created and configured using virsh, and the VM’s XML configuration file can be edited to use one of these new networks.
For more information on the default configuration, see Section 9.7, “Virtual networking default configuration”.
If needed, guest interfaces can instead be set to one of the following modes:
The virtual network uses network address translation (NAT) to assign IP address ranges to virtual networks and dnsmasq to automatically assign IP addresses to virtual machine network interface cards (NICs) and connect to a domain name service (DNS).
The following features are available for virtual networking:
9.1. Virtual networking in routed mode
When using Routed mode, the virtual switch connects to the physical LAN connected to the host machine, passing traffic back and forth without the use of NAT. The virtual switch can examine all traffic and use the information contained within the network packets to make routing decisions. When using this mode, all of the virtual machines are in their own subnet, routed through a virtual switch. This enables incoming connections, but requires extra routing-table entries for systems on the external network. Routed mode operates at Layer 3 of the OSI networking model.

Common topologies
The following are two common topologies in which routed mode is used:
- DMZ
- Virtual server hosting
DMZ
You can create a network where one or more nodes are placed in a controlled sub-network for security reasons. Such a sub-network is known as a demilitarized zone (DMZ).

host machines in a DMZ typically provide services to WAN (external) host machines as well as LAN (internal) host machines. Since this requires them to be accessible from multiple locations, and considering that these locations are controlled and operated in different ways based on their security and trust level, routed mode is the best configuration for this environment.
Virtual server hosting
A virtual server hosting provider may have several host machines, each with two physical network connections. One interface is used for management and accounting, the other is for the virtual machines to connect through. Each virtual machine has its own public IP address, but the host machines use private IP addresses so that management of the virtual machines can only be performed by internal administrators.

9.2. Virtual networking in bridged mode
When using Bridged mode, virtual machines (VMs) are connected to a bridge device that is also connected directly to a physical ethernet device connected to the local ethernet. As a result, the VM is directly visible on the physical network. This enables incoming connections, but does not require any extra routing-table entries.

A VM in bridged mode has to connect to an existing Linux bridge on the host, and therefore requires a network bridge to be created on the host interface. In contrast, other VM networking modes automatically create and connect to the virbr0 virtual bridge.
All of the virtual machines appear within the same subnet as the host machine. All other physical machines on the same physical network are aware of the virtual machines, and can access them. Bridging operates on Layer 2 of the OSI networking model.
It is possible to use multiple physical interfaces on the hypervisor by joining them together with a bond. The bond is then added to a bridge and then virtual machines are added onto the bridge as well. However, the bonding driver has several modes of operation, and only a few of these modes work with a bridge where VMs are in use.
When using bridged mode, the only bonding modes that should be used with a virtual machine are Mode 1, Mode 2, and Mode 4. Using modes 0, 3, 5, or 6 is likely to cause the connection to fail. Also note that Media-Independent Interface (MII) monitoring should be used to monitor bonding modes, as Address Resolution Protocol (ARP) monitoring does not work.
Common scenarios
The most common use cases for bridged mode include:
- Deploying virtual machines in an existing network alongside host machines, making the difference between virtual and physical machines transparent to the end user.
- Deploying virtual machines without making any changes to existing physical network configuration settings.
- Deploying virtual machines that must be easily accessible to an existing physical network. Placing virtual machines on a physical network where they must access services within an existing broadcast domain, such as DHCP.
- Connecting virtual machines to an existing network where VLANs are used.
Additional resources
- For a detailed explanation of bridge_opts parameters, used to configure bridged networking mode, see the Red Hat Virtualization Administration Guide.
9.3. Virtual networking in isolated mode
When using Isolated mode, guests connected to the virtual switch can communicate with each other, and with the host machine, but their traffic will not pass outside of the host machine, and they cannot receive traffic from outside the host machine. Using dnsmasq in this mode is required for basic functionality such as DHCP.

9.4. Virtual networking Network Address Translation
By default, virtual network switches operate in NAT mode. They use IP masquerading rather than Source-NAT (SNAT) or Destination-NAT (DNAT). IP masquerading enables connected guests to use the host machine IP address for communication to any external network. Computers external to the host cannot communicate to the VMs inside when the virtual network switch is operating in NAT mode.

Virtual network switches use NAT configured by iptables rules. Editing these rules while the switch is running is not recommended, because incorrect rules may result in the switch being unable to communicate.
If the switch is not running, you can set the public IP range for forward mode NAT in order to create a port masquerading range by running:
# iptables -j SNAT --to-source [start]-[end]9.5. Virtual networking in open mode
When using Open mode for networking, libvirt does not generate any iptables rules for the network. As a result, iptables rules added outside the scope of libvirt are not overwritten, and the user can therefore manually manage iptables rules.
9.6. Virtual networking DNS and DHCP
The libvirt package includes dnsmasq to provide a Dynamic Host Configuration Protocol (DHCP) server and a Domain Name System (DNS) forwarder for virtual networks.
The dnsmasq DHCP service can assign a pool of addresses to a virtual network switch. IP information can be assigned to virtual machines via DHCP.
dnsmasq accepts DNS queries from virtual machines on the virtual network and forwards them to a real DNS server.
An instance of dnsmasq is automatically configured and started by libvirt for each virtual network switch that needs it.
9.7. Virtual networking default configuration
When the libvirtd daemon (libvirtd) is first installed, it contains an initial virtual network switch configuration in NAT mode. This configuration is used so that installed guests can communicate to the external network through the host machine. The following figure shows the default configuration for libvirtd:

A virtual network can be restricted to a specific physical interface. This may be useful on a physical system that has several interfaces (for example, eth0, eth1, and eth2). This is only useful in routed and NAT modes, and can be defined in the dev=<interface> option, or in the RHEL 8 web console when creating a new virtual network.
Chapter 10. Securing virtual machines in RHEL 8
As an administrator of a system with virtual machines (VMs), ensuring that your VMs are as secure as possible significantly lowers the risk of your guest and host OSs being infected by malicious software.
This document outlines the mechanics of securing VMs on a RHEL 8 host and provides a list of methods to increase the security of your VMs.
10.1. How security works in virtual machines
When using virtual machines (VMs), multiple operating systems can be housed within a single host machine. These systems are connected with the host through the hypervisor, and usually also through a virtual network. As a consequence, each VM can be used as a vector for attacking the host with malicious software, and the host can be used as a vector for attacking any of the VMs.
Figure 10.1. A potential malware attack vector on a virtualization host

Because the hypervisor uses the host kernel to manage VMs, services running on the VM’s operating system are frequently used for injecting malicious code into the host system. However, you can protect your system against such security threats by using a number of security features on your host and your guest systems.
These features, such as SELinux or QEMU sandboxing, provide various measures that make it more difficult for malicious code to attack the hypervisor and transfer between your host and your VMs.
Figure 10.2. Prevented malware attacks on a virtualization host

Many of the features that RHEL 8 provides for VM security are always active and do not have to be enabled or configured. For details, see Section 10.4, “Automatic features for virtual machine security”.
In addition, you can adhere to a variety of best practices to minimize the vulnerability of your VMs and your hypervisor. For more information, see Section 10.2, “Best practices for securing virtual machines”.
10.2. Best practices for securing virtual machines
Following the instructions below significantly decreases the risk of your virtual machines being infected with malicious code and used as attack vectors to infect your host system.
On the guest side:
Secure the virtual machine as if it was a physical machine. The specific methods available to enhance security depend on the guest OS.
If your VM is running RHEL 8, see Configuring and managing security in RHEL 8 for detailed instructions on improving the security of your guest system.
On the host side:
- When managing VMs remotely, use cryptographic utilities such as SSH and network protocols such as SSL for connecting to the VMs.
Ensure SELinux is in Enforcing mode:
# getenforce
Enforcing
If SELinux is disabled or in Permissive mode, see the Configuring and managing security guide for instructions to activate Enforcing mode.
NoteSELinux Enforcing mode also enables the sVirt RHEL 8 feature. This is a set of specialized SELinux booleans for virtualization, which can be manually adjusted for fine-grained VM security management.
Use VMs with SecureBoot:
SecureBoot is a feature that ensures that your VM is running a cryptographically signed OS. This prevents VMs whose OS has been altered by a malware attack from booting.
SecureBoot can only be applied when installing a Linux VM that uses OVMF firmware. For instructions, see Section 10.3, “Creating a SecureBoot virtual machine”.
Do not use
qemu-*commands, such asqemu-img.QEMU is an essential component of the virtualization architecture in RHEL 8, but it is difficult to manage manually, and improper QEMU configurations may cause security vulnerabilities. Therefore, using
qemu-*commands is not supported by Red Hat. Instead, it is highly recommended to interact with QEMU using libvirt utilities, such asvirsh,virt-install, andvirt-xml, as these orchestrate QEMU according to the best practices.
Additional resources
- For detailed information on modifying your virtualization booleans, see Section 10.5, “Virtualization booleans in RHEL 8”.
10.3. Creating a SecureBoot virtual machine
The following provides instructions on creating a Linux virtual machine that uses the SecureBoot feature, which ensures that your VM is running a cryptographically signed OS. If the guest OS of a VM has been altered by malware, SecureBoot prevents the VM from booting, which stops the potential spread of the malware to your host machine.
Prerequisites
- The VM is using the Q35 machine type.
The
edk2-OVMFpackages installed:# yum install edk2-ovmfAn operating system (OS) installation source, which can be one of the following, and can be available locally or on a network:
- A physical installation medium, such as a DVD
- An ISO image of an installation medium
- A disk image of an existing guest installation
- Optionally, a Kickstart file can also be provided for faster and easier configuration of the installation.
Procedure
Use the
virt-installcommand to create a virtual machine (VM) as detailed in Section 2.2.2, “Creating virtual machines using the command-line interface”. For the--bootoption, use theuefi,nvram_template=/usr/share/OVMF/OVMF_VARS.secoot.fdvalue. This uses theOVMF_VARS.secboot.fdandOVMF_CODE.secboot.fdfiles as templates for the VM’s non-volatile RAM (NVRAM) settings, which enables the SecureBoot feature.For example:
# virt-install --name rhel8sb --memory 4096 --vcpus 4 --os-variant rhel8.0 --boot uefi,nvram_template=/usr/share/OVMF/OVMF_VARS.secboot.fd --disk boot_order=2,size=10 --disk boot_order=1,device=cdrom,bus=scsi,path=/images/RHEL-8.0-installation.iso- Follow the OS installation procedure according to the instructions on the screen.
- After the guest OS is installed, access the VM’s command line by opening the terminal in the graphical guest console or connecting to the guest OS using SSH.
Verify that SecureBoot is enabled by using the
mokutil --sb-statecommand:# mokutil --sb-state SecureBoot enabled
10.4. Automatic features for virtual machine security
In addition to manual means of improving the security of your virtual machines listed in Section 10.2, “Best practices for securing virtual machines”, a number of security features are provided by the libvirt software suite and automatically enabled when using virtualization in RHEL 8. These include:
- System and user sessions
To access all the available utilities for virtual machine management in RHEL 8, you need to use the system session of libvirt. To do so, you must have root privileges on the system or be a part of the libvirt user group.
Non-root users that are not in the libvirt group can only access a user session of libvirt, which has to respect the access rights of the local user when accessing resources. For example, in the user session, you cannot detect or access VMs created in the system session or by other users. Also, available VM networking configuration options are significantly limited.
NoteThe RHEL 8 documentation assumes you have libvirt system session privileges.
- Virtual machine separation
- Individual VMs run as isolated processes on the host, and rely on security enforced by the host kernel. Therefore, a VM cannot read or access the memory or storage of other VMs on the same host.
- QEMU sandboxing
- A feature that prevents QEMU code from executing system calls that can compromise the security of the host.
- Kernel Address Space Randomization (KASLR)
- Enables randomizing the physical and virtual addresses at which the kernel image is decompressed. Thus, KASLR prevents guest security exploits based on the location of kernel objects.
10.5. Virtualization booleans in RHEL 8
For fine-grained configuration of virtual machines security on a RHEL 8 system, you can configure SELinux booleans on the host to ensure the hypervisor acts in a specific way.
To list all virtualization-related booleans and their statuses, use the getsebool -a | grep virt command:
$ getsebool -a | grep virt
[...]
virt_sandbox_use_netlink --> off
virt_sandbox_use_sys_admin --> off
virt_transition_userdomain --> off
virt_use_comm --> off
virt_use_execmem --> off
virt_use_fusefs --> off
[...]
To enable a specific boolean, use the setsebool -P boolean_name on command as root. To disable a boolean, use setsebool -P boolean_name off.
The following table lists virtualization-related booleans available in RHEL 8 and what they do when enabled:
Table 10.1. SELinux virtualization booleans
| SELinux Boolean | Description |
|---|---|
| staff_use_svirt | Enables non-root users to create and transition VMs to sVirt. |
| unprivuser_use_svirt | Enables unprivileged users to create and transition VMs to sVirt. |
| virt_sandbox_use_audit | Enables sandbox containers to send audit messages. |
| virt_sandbox_use_netlink | Enables sandbox containers to use netlink system calls. |
| virt_sandbox_use_sys_admin | Enables sandbox containers to use sys_admin system calls, such as mount. |
| virt_transition_userdomain | Enables virtual processes to run as user domains. |
| virt_use_comm | Enables virt to use serial/parallel communication ports. |
| virt_use_execmem | Enables confined virtual guests to use executable memory and executable stack. |
| virt_use_fusefs | Enables virt to read FUSE mounted files. |
| virt_use_nfs | Enables virt to manage NFS mounted files. |
| virt_use_rawip | Enables virt to interact with rawip sockets. |
| virt_use_samba | Enables virt to manage CIFS mounted files. |
| virt_use_sanlock | Enables confined virtual guests to interact with the sanlock. |
| virt_use_usb | Enables virt to use USB devices. |
| virt_use_xserver | Enables virtual machine to interact with the X Window System. |
Chapter 11. Feature support and limitations in RHEL 8 virtualization
This document provides information on feature support and restrictions in Red Hat Enterprise Linux 8 (RHEL 8) virtualization.
11.1. How RHEL 8 virtualization support works
A set of support limitations applies to virtualization in Red Hat Enterprise Linux 8 (RHEL 8). This means that when you use certain features or exceed a certain amount of allocated resources when using virtual machines in RHEL 8, Red Hat will not support these guests unless you have a specific subscription plan.
Features listed in Section 11.2, “Recommended features in RHEL 8 virtualization” have been tested and certified by Red Hat to work with the KVM hypervisor on a RHEL 8 system. Therefore, they are fully supported and recommended for use in virtualization in RHEL 8.
Features listed in Section 11.3, “Unsupported features in RHEL 8 virtualization” may work, but are not supported and not intended for use in RHEL 8. Therefore, Red Hat strongly recommends not using these features in RHEL 8 with KVM.
Section 11.4, “Resource allocation limits in RHEL 8 virtualization” lists the maximum amount of specific resources supported on a KVM guest in RHEL 8. Guests that exceed these limits are not supported by Red Hat.
In addition, unless stated otherwise, all features and solutions used by the documentation for RHEL 8 virtualization are supported. However, some of these have not been completely tested and therefore may not be fully optimized.
Many of these limitations do not apply to other virtualization solutions provided by Red Hat, such as Red Hat Virtualization (RHV) or Red Hat OpenStack Platform (RHOSP).
11.2. Recommended features in RHEL 8 virtualization
The following features are recommended for use with the KVM hypervisor included with Red Hat Enterprise Linux 8 (RHEL 8):
Host system architectures
Red Hat Enterprise Linux with KVM is supported only on the following host architectures:
- AMD64 and Intel 64
- IBM Z - IBM z13 systems and later
- IBM POWER8
IBM POWER9
NoteRHEL 8 documentation primarily describes AMD64 and Intel 64 features and usage. For information about the specific of using RHEL 8 virtualization on different architectures, see:
Guest operating systems
Red Hat supports KVM virtual machines that use the following operating systems:
- Red Hat Enterprise Linux 6 and later
- Microsoft Windows 10 and later
- Microsoft Windows Server 2016 and later
Q35 guests
The recommended machine type for KVM guest virtual machines is QEMU Q35, which emulates the ICH9 chipset.
Additional resources
- For information about unsupported guest OS types and features in RHEL 8 virtualization, see Section 11.3, “Unsupported features in RHEL 8 virtualization”.
- For information about the maximum supported amounts of resources that can be allocated to a virtual machine, see Section 11.4, “Resource allocation limits in RHEL 8 virtualization”.
11.3. Unsupported features in RHEL 8 virtualization
The following features are not supported by the KVM hypervisor included with Red Hat Enterprise Linux 8 (RHEL 8):
Many of these limitations do not apply to other virtualization solutions provided by Red Hat, such as Red Hat Virtualization (RHV) or Red Hat OpenStack Platform (RHOSP).
Guest operating systems
KVM virtual machines using the following guest operating systems on a RHEL 8 host are not supported:
- Microsoft Windows 8.1 and earlier
- Microsoft Windows Server 2012 and earlier
- macOS
- Solaris for x86 systems
- Any OS released prior to 2009
vCPU hot unplug
Removing a virtual CPU (vCPU) from a running KVM virtual machine, also referred to as a vCPU hot unplug, is unsupported in RHEL 8 and using it may lead to VM crashes. Therefore, Red Hat strongly advises against its use.
Memory hot unplug
Decreasing the memory limit allocated to running a KVM virtual machine, also referred to as a memory hot unplug, is unsupported in RHEL 8 and using it may lead to VM crashes. Therefore, Red Hat strongly advises against its use.
SR-IOV networking
Single-root I/O virtualization (SR-IOV) networking is not supported in RHEL 8.
I/O throttling
Configuring maximum input and output levels for operations on virtual disk, also known as I/O throttling, is not supported in RHEL 8.
Storage live migration
Migrating a disk image of a running virtual machine between hosts is not supported in RHEL 8.
Live snapshots
Creating or loading a snapshot of a running virtual machine, also referred to as a live snapshot, is not supported in RHEL 8.
Vhost-user
RHEL 8 does not support the implementation of a user-space vHost interface.
S3 and S4 system power states
Suspending a virtual machine to the Suspend to RAM (S3) or Suspend to disk (S4) system power states is not supported. Note that these features are disabled by default, and enabling them will make your virtual machine not supportable by Red Hat.
S3-PR on a multipathed vDisk
SCSI3 persistent reservation (S3-PR) on a multipathed vDisk is not suppported in RHEL 8. As a consequence, Windows Cluster is not supported in RHEL 8. In case you need Windows Cluster support, use Red Hat Virtualization (RHV) instead.
virtio-crypto
The drivers for the virtio-crypto device are available in the RHEL 8 kernel, and the device can thus be enabled on a KVM hypervisor under certain circumstances. However, using the virtio-crypto device in RHEL 8 is not supported and highly discouraged.
Additional resources
- For information about supported guest OS types and recommended features in RHEL 8 virtualization, see Section 11.2, “Recommended features in RHEL 8 virtualization”.
- For information about the maximum supported amounts of resources that can be allocated to a virtual machine, see Section 11.4, “Resource allocation limits in RHEL 8 virtualization”.
11.4. Resource allocation limits in RHEL 8 virtualization
The following limits apply to virtualized resources that can be allocated to a single virtual machine on a Red Hat Enterprise Linux 8 (RHEL 8) host.
Many of these limitations do not apply to other virtualization solutions provided by Red Hat, such as Red Hat Virtualization (RHV) or Red Hat OpenStack Platform (RHOSP).
Maximum virtual machines per host
A single RHEL 8 host supports up to 4 guests running at the same time.
Maximum vCPUs per guest
RHEL 8 supports up to 384 vCPUs allocated to a single KVM guest.
PCI devices per guest
RHEL 8 supports 32 PCI device slots per virtual machine bus, and 8 PCI functions per device slot. This gives a theoretical maximum of 256 PCI functions per bus when multi-function capabilities are enabled in the virtual machine, and no PCI bridges are used.
Each PCI bridge adds a new bus, potentially enabling another 256 device addresses. However, some buses do not make all 256 device addresses available for the user; for example, the root bus has several built-in devices occupying slots.
Virtualized IDE devices
KVM is limited to a maximum of 4 virtualized IDE devices per virtual machine.